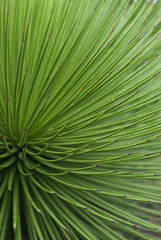
Here is a slightly abstract shot of a plant I spotted at the Mt Cootha Botanic Gardens on Sunday. It was raining a little at the time, and you can make out the rain drops on the leaves.
I took this very quickly (it was raining on my remember) using the K200D and Jupiter-9 85mm f2.0 which was already mounted on the camera.
Almost no editing done here at all, just a slight crop
Thursday, March 11, 2010
I'm James...
This is a sign on the front of a local bank branch in Brisbane, I was waiting for a friend to make a deposit inside, waiting for someone interesting to be James :)
This couple came out of the branch about the same time as my friend, so I quickly snapped them. Its got a little more motion blur than I would like...but thats life I guess!
Almost time to get myself an AF prime for this sorta stuff i think, just have to convince my fiance. I'm sure she will go for it! haha
This blog has moved to HERE!
Wednesday, March 10, 2010
Abstract Awnings
Here is another abstract shot of a building. This one is also on Ann St in the Brisbane CBD, its not quite on this much of an angle, but still it is there.
I took this one on the same day as the previous post, and also used the Pentax K200D and the Pentax SMC F 35-70mm f3.5-4.5 lens.
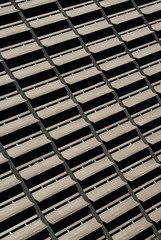
I took this one on the same day as the previous post, and also used the Pentax K200D and the Pentax SMC F 35-70mm f3.5-4.5 lens.
This blog has moved to HERE!
Tuesday, March 9, 2010
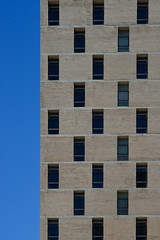
Building vs Blue
Here is an abstract shot I took last year. It is a building found on Ann St in Brisbane, with a nice pattern to its windows, contrasting against the clear blue sky (haven't seen many of those lately!)
This one was taken with the Pentax SMC F 35-70mm f3.5-4.5 lens and Pentax K200D body. It was processed in Lightroom, and then I used The Gimp to apply a small amount of perspective correction. The last step I had to do because I was shooting looking up, so the lines were not quite straight.
Perspective correction basically squeezes 1 end of the photo, to correct the converging lines you get as things get further away. In this shot the line between the building and the sky was sloping slightly from left at the bottom of shot, to right at the top of shot, even though I was cropping the image with the line of windows at the right side straight up and down.
Here is a good example of a much more extreme perspective correction on a shot.
This blog has moved to HERE!
Monday, March 8, 2010
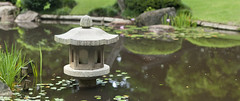
Project 52 - #8 - Japanese Garden, Mt Cootha
I am a little behind, but I hope to catch up this week. We have had rainy weather non stop for a couple weeks now. Yesterday I got out amongst the showers in the Mt Cootha Botanic Gardens, and in particular wanted to visit the Japanese Garden. You can read about the garden here.
Over the last week or so I've been discussing shooting in various different aspect ratios with a friend at work. He had the idea to shoot only in a particular aspect ratio for a bit. After this discussion I decided to copy his idea a little, and try shooting some stuff in the movie aspect ratio of 2.39:1 (my friend has decided on 16:9 btw). This is from my first shoot where I specifically considered shooting in this aspect. I dont plan on taking lots of shots in this aspect ratio, but it is fun to consider.
This is a Brenizer Panorama, taken with my Pentax K200D and Jupiter-9 85mm lens at f2.8. I stitched the shots using Autopano, then did some editing in Lightroom 2.5 to get the final result (crop, contrast, exposure, blacks)
This blog has moved to HERE!
Friday, March 5, 2010
Sunset Reflection Timelapse
Timelapse Fail
Originally uploaded by jezza323
On a more positive note, i have finally found a really good CHDK script for sunset/sunrise timelapses. If you have CHDK look at the CHDK forums, in the scripts section, for the Sunset F16 script. works wonderfully, even if it takes 4-5 shots at the beginning to get the exposure right.
I will set this shot up again tonight, with less reflections (i hope!)
This blog has moved to HERE!
Thursday, March 4, 2010
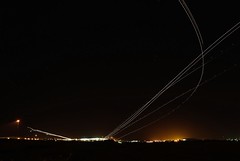
Brisbane Airport in Action
Here is another example of using Startrails.exe for something other than startrails. This shot was taken almost a year ago now, its made of many 30 sec exposures stacked together to get the multiple trails of planes coming in to land, and taking off.
This shot is another example of using startrails for adding elements into a shot
This shot is another example of using startrails for adding elements into a shot
This blog has moved to HERE!
Subscribe to:
Posts (Atom)
