I have very slowly been moving my blog over to a wordpress site on my own hosting, and the time has finally come to make the switch. I will be switching the feed from this blog over to the new blog after this post so you will get all the posts from the new blog very soon.
So please continue to read and follow over at my new url - http://jezza323.com/blog
I am still getting the post categories and tags sorted, but all the old posts have been moved over, and there are some new posts for you to read also! Enjoy!
Thursday, August 19, 2010
Wednesday, July 28, 2010
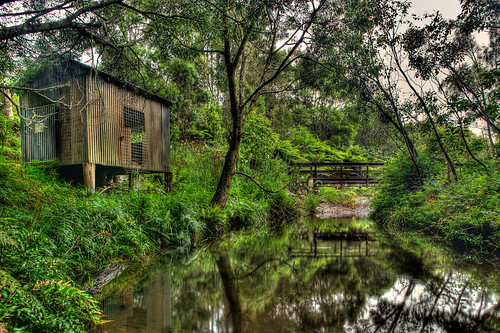
Peregrine Winery, Gibbston Valley
The old building at the Peregrine Winery, Gibbston Valley, Central Otago, New Zealand.
Highly recommend their wines!
Taken with Pentax K200D and Sigma 10-20mm f4.0-5.6
Single shot processed in Lightroom 3

Highly recommend their wines!
Taken with Pentax K200D and Sigma 10-20mm f4.0-5.6
Single shot processed in Lightroom 3
This blog has moved to HERE!
Tuesday, June 1, 2010
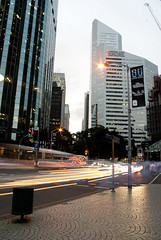
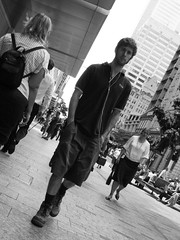
Sunday Morning Stroll
Went into the city on Sunday morning to collect some tv shows off my work pc and meaning to get some long exposure IR shots. As it turns out im far too lazy to lug my tripod around the city on a Sunday morning, so just took a couple of street shots instead.
I spotted these interesting shadows so was just waiting for the right person to come along to snap this shot.
Taken with the Pentax K200D and Tamron 17-50mm f2.8 lens @ 50mm f6.3, ISO 200 and 1/1250 shutter speed
I spotted these interesting shadows so was just waiting for the right person to come along to snap this shot.
Taken with the Pentax K200D and Tamron 17-50mm f2.8 lens @ 50mm f6.3, ISO 200 and 1/1250 shutter speed
This blog has moved to HERE!
Saturday, May 29, 2010
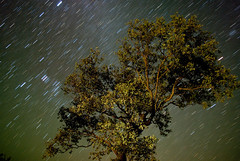
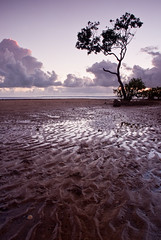
Tree with Trails
A short startrail with a nice foreground tree. This is a single exposure, with long exposure noise reduction switched on in the camera. I was quite lucky that there was almost no wind, the tree seems very sharp considering the length of the exposure.
I took this on my Moogerah camping trip
I took this on my Moogerah camping trip
This blog has moved to HERE!
Friday, May 28, 2010
Remax Balloon Flight
Here is a shot taken with my lovely Tair-11a lens. As we were getting ready to head off some balloons launched and drifted across between the lookout and the city. The 135mm Tair-11a provided a "close up" (not very close at all really!) of the early morning light on the balloon.

This blog has moved to HERE!
Thursday, May 27, 2010
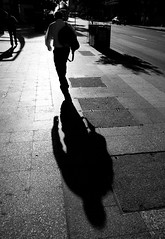
Morning Shadows
This is a shot I have been wanting to get for a while, but am often running late or don't have my camera with me. I finally took time out on my way to work to capture the great shadows along the sidewalk between the train station and my building in the morning.
The sun reflecting off the paving really contrasts against the deep long shadows well. This is also the first shot posted online from my brand new Tamron 17-50mm f2.8 lens which I purchased from Citiwide online ebay store. I had a $50 paypal credit for a survey and a 20% off paypal voucher which made the purchase much cheaper than it had rights to be.
Enjoy!
This blog has moved to HERE!
Wednesday, May 12, 2010
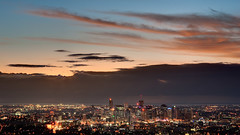
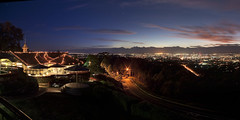
Night Lights and Dawn Sky
View from Mt Cootha Lookout before the lights go out, but while the sky is beginning to light up
Taken with the Pentax K200D body, noompty's Pentax SMC DA 70 f2.4 Limited lens, Slik 500DX Pro tripod and remote cable release. The detail from this lens is quite amazing
3 shots at +/- 2.0 EV blended using Photomatix Exposure Blending.
Taken with the Pentax K200D body, noompty's Pentax SMC DA 70 f2.4 Limited lens, Slik 500DX Pro tripod and remote cable release. The detail from this lens is quite amazing
3 shots at +/- 2.0 EV blended using Photomatix Exposure Blending.
This blog has moved to HERE!
Tuesday, May 11, 2010

Monday, May 10, 2010

Friday, May 7, 2010
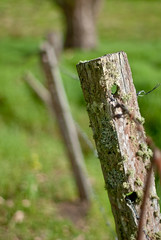
50mm Fence Post
Was mucking around with the 50mm nice n wide during the day while camping at Queen Mary Falls, this is one of the better shots I managed to pull out
The shadow was a bit harsh, but i think ive overdone the fill light a little, seems to be lacking contrast now :(
Taken with Pentax K200D, Pentax SMC A 50mm f1.7 and processed in Lightroom 2.5
The shadow was a bit harsh, but i think ive overdone the fill light a little, seems to be lacking contrast now :(
Taken with Pentax K200D, Pentax SMC A 50mm f1.7 and processed in Lightroom 2.5
This blog has moved to HERE!
Thursday, May 6, 2010
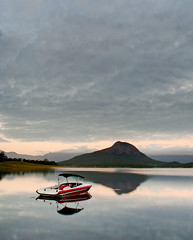
Moogerah Reflections
This is a bit of a "From the vault" shot. This was back from the first trip to Moogerah.
Taken with Pentax K200D, Pentax SMC DA 18-55 AL II, Slik 500 DX Pro tripod and cable remote.
HDR'ed using Photomatix, Tonemapping using Details Enhancer method from 3 shots, taken at +/- 2.0 EV
Taken with Pentax K200D, Pentax SMC DA 18-55 AL II, Slik 500 DX Pro tripod and cable remote.
HDR'ed using Photomatix, Tonemapping using Details Enhancer method from 3 shots, taken at +/- 2.0 EV
This blog has moved to HERE!
Friday, April 30, 2010
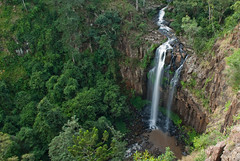
More Main Range Waterfalls
I can't remember the name of this waterfall. There is a lookout to view it on the downhill run from Queen Mary Falls to Kilarney.
This is just a CPL filter shot this time, but closed the aperture right down, turned Shake Reduction (IS/VR/OS whatever your manufacturer of choice calls it) and snapped away about 7 handheld shots at 0.5s exposure. This was the sharpest, and i think its pretty damn good!
Taken with Pentax K200D, Pentax SMC DA 18-55 AL II lens and Kenko CPL filter.
Processed in Lightroom 2.5, minor adjustments only.
This blog has moved to HERE!
Thursday, April 29, 2010
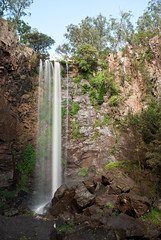
Queen Mary Falls
This is Queen Mary Falls itself, in the Main Range National Park (at the very southern end).
Its a 2km loop walk to the bottom of the falls from the carpark and back, little steep at the beginning going down, but not too bad. I wandered down with my camera gear and tripod.
This is the very first shot i ever took with the Hoya NDX400 filter (once I had worked out the exposure). I have found with my body I need to set exposure compensation to +2.0 just to get the correct exposure when using the NDX400 filter. This isnt a real problem as generally I will be wanting to use exposures longer than 30 secs anyway, which means ill be into bulb mode territory.
This was shot using the Pentax K200D, Pentax SMC DA 18-55 AL II kit lens, Hoya NDX400 filter and Slik 500DX Pro tripod. It was processed in Lightroom 2.5 but I can't quite remember what I did with it...
This blog has moved to HERE!
Wednesday, April 28, 2010
Hillside Sunset
This is the 2nd shot processed from my camping weekend. It is a Hoya R72 infrared shot on my K200D body, with the kit 18-55 lens.
I took this from our campsite, looking over the neighbouring paddock as the sun set. I first took a couple of shots with a 30 sec shutter speed to get the exposure correct. I then adjusted the aperture and calculated the shutter speed that would be required to maintain the same exposure level, set the camera on bulb and took the shot.
This shot was a 134 sec exposure time, i was aiming for around 2 mins, but i lost count near the end, but it still came out fine. It was shot at f13.0, ISO 100.
It was processed in Lightroom 2.5, cropped to 16x9 and straightened slightly (i used the trees as a guide for where up is), white balance adjustment, converted to greyscale and had a contrast adjustment.
This blog has moved to HERE!
Tuesday, April 27, 2010
Hoya NDX400 (ND400) filter
I have finally given in and bought myself a good quality ND filter. I went with the Hoya NDX400 (9-stop) filter. I bought this filter as the only 2 filters I am confident of the quality with are this, and the B+W 110 (10-stop) filter, but the B+W in the 52mm size required for my kit lens is quite a bit more expensive than the Hoya. I bought the filter from Citiwide on ebay. They are a Hong Kong based ebay store, and the service was excellent. The filter was shipped the very next day after payment was made. It did take a little while to get here from Hong Kong, but I expected that.
I took the filter out for its first real use on the weekend when I went camping at Queen Mary Falls, not far from Killarney on the Darling Downs in Queensland. I took a few shots of the falls, starting off without the filter, then with the filter for a comparison. I will post up the results tomorrow. Its a beautiful area, and I will be posting a number of shots from around there over the next week or so, the previous photo of the Condamine River Head Waters is the first posted shot from the NDX400 filter, so I will post it again, just to make sure.
This filter certainly puts the cheap one I had previously to shame :) The colours are only slightly warmer than usual, but this might just be a white balance detection problem with the filter on more than colours themselves.
This blog has moved to HERE!
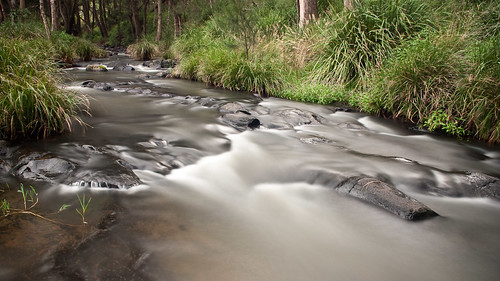
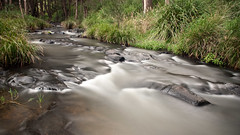
Condamine River Head Waters
This is the head waters of the Condamine River, from here its nearly 3000 km journey to the sea, which it flows into near Adelaide in South Australia.
Taken with Pentax K200D, Pentax SMC DA 18-55 AL II, Hoya NDX400 filter and Slik 500DX Pro tripod. The shot was taken under a slightly cloudy sky around 10am, so it was not all that dark, with the NDX400 filter, ISO 100 and using an aperture of f-9.0 I was able to use a shutter speed of 30 secs to get a nice exposure. It took me a few goes to get the exposure spot on.
Processed in Lightroom 2.5, cropped, minor adjustments to levels.
I hope someone is noticing my obsession with 16x9 crops atm, loving them!
This blog has moved to HERE!
Wednesday, April 21, 2010
Sun on the Rocks and Trees
3rd of the infrared shots from Sundays photo trip. This is with the sun to my back, coming up over the hill behind me. Looking out at the dead trees across Lake Moogerah. It took me about 3 goes to get the exposure right on this but it was worth it, although i was getting a bit worried the sun would come over the top of the hill and ruin it before i got it
This is probably the best shot of the day, at least i think so!
I took this with the Pentax K200D, Pentax SMC DA 18-55 AL II kit lens, Slik 500DX Pro tripod, remote cable release and of course the Hoya R72 infrared filter.
Processed in Lightroom 2.5, cropped, white balance adjustment and greyscale conversion. Also a slight bump in contrast.
This blog has moved to HERE!
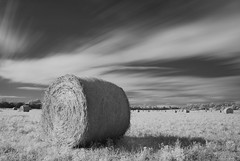
A Roll In A Field
My friend and i spotted this paddock of hay bales on the side of the highway on the way back from our early morning shoot at Lake Moogerah. I've always wanted to shoot something like this, so it was great to get the opportunity.
Taken with the Pentax K200D, Pentax SMC DA 18-55 AL II lens, Hoya R72 filter and Slik 500DX Pro tripod. I handheld the shutter on this bulb, almost 3 mins!
Processed in Lightroom 2.5, adjusted white balanced, converted to greyscale, and minor contrast adjustment.
Taken with the Pentax K200D, Pentax SMC DA 18-55 AL II lens, Hoya R72 filter and Slik 500DX Pro tripod. I handheld the shutter on this bulb, almost 3 mins!
Processed in Lightroom 2.5, adjusted white balanced, converted to greyscale, and minor contrast adjustment.
This blog has moved to HERE!
Monday, April 19, 2010
The Sun is Coming
The first of many shots I will be posting from my Sunday morning trip to Lake Moogerah for sunrise. This was a 71 sec exposure, taken pre-sunrise, using the Pentax K200D, Pentax SMC DA 18-55 AL II, Hoya R72 infrared filter and Slik 500DX Pro tripod.
It was shot in RAW (PEF) and I processed it using Lightroom 2.5, changed white balance (need to for infrared shots), and converted to greyscale, that was about all!

It was shot in RAW (PEF) and I processed it using Lightroom 2.5, changed white balance (need to for infrared shots), and converted to greyscale, that was about all!
This blog has moved to HERE!
Thursday, April 15, 2010
Suncorp Building, Ann St Brisbane
This is a quick one I took at lunchtime yesterday from Ann St. Taken with the Pentax K200D body, and Pentacon 30mm f3.5 M42 lens @ f9.5.
Processed with Lightroom 2.5, converted to greyscale and bumped contrast and clarity.
Processed with Lightroom 2.5, converted to greyscale and bumped contrast and clarity.
This blog has moved to HERE!
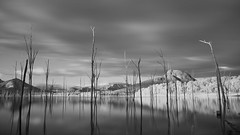
Lake Moogerah Sunrise in IR
Here is another case of using my Hoya R72 infrared filter for a daytime long exposure black and white shot. This was shortly after sunrise during my camping trip to Lake Moogerah a few weeks back.
The long exposure gives the clouds the nice blanket effect, and the patch of sunlight gives a nice IR effect, but the lack of light on the hills/mountains means they do appear a bit flat.

The long exposure gives the clouds the nice blanket effect, and the patch of sunlight gives a nice IR effect, but the lack of light on the hills/mountains means they do appear a bit flat.
This blog has moved to HERE!
Wednesday, March 31, 2010
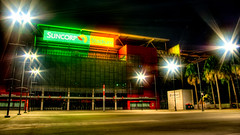
Project 52 - #11 - Suncorp Stadium, Brisbane
This is the major local football stadium in Brisbane - Suncorp Stadium (previously known as Lang Park). Just a few minutes from the CBD it is the home of 3 major teams competing in national competitions. The Brisbane Broncos (Rugby League), The Queensland Roar (Soccer) and The Queensland Reds (Rugby Union).
This is a HDR composed of 3 shots, taken at +/- 2.0 EV and blended in Photomatix using the Details Enhancer. It is also cropped in a 16:9 ratio.
This is a HDR composed of 3 shots, taken at +/- 2.0 EV and blended in Photomatix using the Details Enhancer. It is also cropped in a 16:9 ratio.
This blog has moved to HERE!
Thursday, March 25, 2010
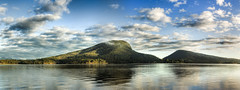
Lake Moogerah Sunrise Again
Here is another HDR Panorama from my Lake Moogerah camping trip. I really like the colour of the sky and the reflections in this.
Let me know what you think!
Let me know what you think!
This blog has moved to HERE!
Tuesday, March 23, 2010
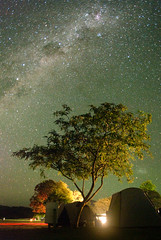
Moogerah Milky Way
I spent the weekend just gone camping out at Lake Moogerah, about 1.5 hrs drive south west of Brisbane. I went on Friday night after work, and returned just before lunchtime on sunday. The sky was beautifully clear on Friday night (despite a tropical cyclone hitting the coast about 1000 km's away). So immediately after setting up camp, we broke out the tripods and cameras and started snapping the amazing stars which were visible.
People who have seen this shot keep asking how I knew where to point the camera, but its very easy, you can see almost as much as this with the naked eye. It really is amazing how much light pollution kills the view of the stars.
I went with a good mate of mine, and my fiance. It was due to be a boys photography weekend, but when my fiance said she wanted to come and check out this whole camping caper, who was I to say no? She enjoyed viewing the stars, and the two of us took enough photos to last a few weeks of PP.
This shot was taken using the K200D and the Pentax SMC DA 18-55 AL II kit lens. I set the lens to f4.0, as it is slightly soft wide open, 18mm because I wanted the shot as wide as possible (I really wish I could have gone wider! When Zennon posts his shots with the Sigma 10-20mm I will be sure to share them). I set the ISO to 1600, the camera's inbuilt long exposure noise reduction to ON, and the mode to Bulb.
Carefully I aimed my shot at our campsite (yes those are our tents, my fiance is even in the one on the right sleeping) and started the exposure using a cable remote (with a lock). I could lie and said I timed the exposure to perfection, but in reality I just waited till I thought it might be a good time to stop, and unlocked the shutter button on the cable remote. This is where it gets frustrating....now I had to wait again as long as the shutter was open for the noise reduction to process.
What happens here is the camera takes another exposure, the same length, at the same ISO, but with the shutter closed. This creates a dark frame, but with all the same noise/hot pixels as the original shot. The software in the camera then subtracts this dark frame from the original, which leaves it with much less noise.
I was immediately happy with this shot upon seeing it on the LCD, but I was unable to get more the same. The dew in the air was at all time record highs it would seem, anything and everything exposed to it was getting covered with a lovely layer of moisture, including my lens. Everytime I tried another long exposure after this one, the lens would fog up so badly it would ruin the shot.
This was processed in Lightroom 2.5 with the only the following 2 changes, Brightness +87, Contrast +51
I am really keen to head back to the camping spot for more of these kind of shots in the near future. Hopefully after I have myself a wider lens. I am currently looking at something like the Sigma 10mm f/2.8 EX DC Fisheye, which would give great views of the milky way, and allow me to do little planet photos and VR tours. Lets keep hoping!
This blog has moved to HERE!
Friday, March 19, 2010
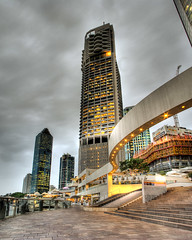
Project 52 - #10 - Brisbane Riverwalk
This is looking down part of the Brisbane Riverwalk. I took this shot from next to the Riverside Centre building, the main building in the shot is the Riparian Plaza and the building at the left is Waterfront Place.
Taken using Pentax K200D, Pentax SMC DA 18-55 AL II and Slik 500 DX Pro Tripod. This is a HDR Panorama, composed of 5 HDR images (I overlapped them a lot), each composed of 3 images shot at +2, 0, -2. Blended and Tone Mapped with Photomatix batch processor using Details Enhancer, and stitched using Autopano.
Taken using Pentax K200D, Pentax SMC DA 18-55 AL II and Slik 500 DX Pro Tripod. This is a HDR Panorama, composed of 5 HDR images (I overlapped them a lot), each composed of 3 images shot at +2, 0, -2. Blended and Tone Mapped with Photomatix batch processor using Details Enhancer, and stitched using Autopano.
This blog has moved to HERE!
Thursday, March 18, 2010
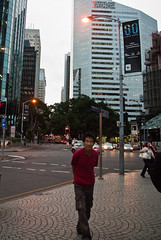
Interested in my Ghosts
I shot this as I was setting up for the "Ghosts in the City" shot. I had the tripod all set, almost ready to go when this guy came wandering over for a look. So I took some shots of him. I had to up the ISO a bit to get him to stay still, but it came out ok.
This blog has moved to HERE!
Tuesday, March 16, 2010
Ghosts in the City
This is yet another stack, this time with ppl in it as well. Taken looking up Creek St in the Brisbane CBD on Thursday afternoon. The shots were only 1.6 sec exposures as it wasnt very dark yet, but the effect seems to have worked out ok.
There are no people directly in front of the camera as they were walking too fast past there to really show up in the shots.
I like the look of the people in motion here, so I think I will try for shots like this again in the future. It may be easier to get these shots during the day if I can get the shutter speed slow enough. Maybe it is time to order that Hoya ND400 filter I have been keeping an eye on.
This blog has moved to HERE!
Monday, March 15, 2010
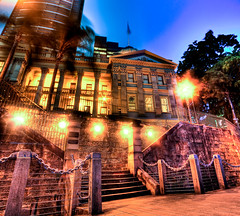
Project 52 - #9 - Old Customs House
This is a shot of the Old Customs House in Brisbane. This is the view from the Brisbane Riverwalk.
This shot is another HDR Panorama, this time blended at stitched from 12 photos. It is stitched from 4 HDR images in a 2x2 layout using Autopano Giga, and each HDR image was shot at +/- 2.0 EV and then blended using Photomatix with the Batch Processing function, using Details Enhancer for Tone Mapping.
Shooting and Processing
- Shot all 12 photos in Pentax RAW (PEF), 4 lots of +/- 2.0 EV brackets
- Imported all images from memory card using Lightroom 2.5
- Exported all 12 photos to a new subfolder as 1bit TIFF files
- Opened Photomatix and ran Batch Process over the new subfolder
- Opened Autopano and selected the 4 resulting TIFF HDR images to stitch
- Rendered the created panorama to another 16-bit TIFF
- Imported final TIFF into Lightroom 2.5
- Edited white balance (its a hard one because the Riverwalk is lit with different colour lights to the lights on Customs House and cropped image
- Exported to JPG for Web
This blog has moved to HERE!
Thursday, March 11, 2010
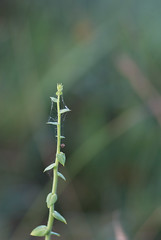
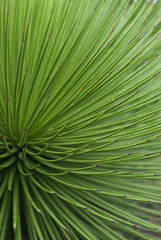
Spikes in the Rain
Here is a slightly abstract shot of a plant I spotted at the Mt Cootha Botanic Gardens on Sunday. It was raining a little at the time, and you can make out the rain drops on the leaves.
I took this very quickly (it was raining on my remember) using the K200D and Jupiter-9 85mm f2.0 which was already mounted on the camera.
Almost no editing done here at all, just a slight crop
I took this very quickly (it was raining on my remember) using the K200D and Jupiter-9 85mm f2.0 which was already mounted on the camera.
Almost no editing done here at all, just a slight crop
This blog has moved to HERE!
I'm James...
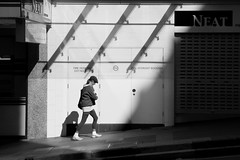
This is a sign on the front of a local bank branch in Brisbane, I was waiting for a friend to make a deposit inside, waiting for someone interesting to be James :)
This couple came out of the branch about the same time as my friend, so I quickly snapped them. Its got a little more motion blur than I would like...but thats life I guess!
Almost time to get myself an AF prime for this sorta stuff i think, just have to convince my fiance. I'm sure she will go for it! haha
This blog has moved to HERE!
Wednesday, March 10, 2010
Abstract Awnings
Here is another abstract shot of a building. This one is also on Ann St in the Brisbane CBD, its not quite on this much of an angle, but still it is there.
I took this one on the same day as the previous post, and also used the Pentax K200D and the Pentax SMC F 35-70mm f3.5-4.5 lens.
I took this one on the same day as the previous post, and also used the Pentax K200D and the Pentax SMC F 35-70mm f3.5-4.5 lens.
This blog has moved to HERE!
Tuesday, March 9, 2010
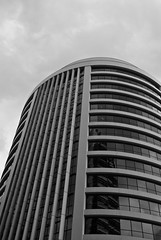
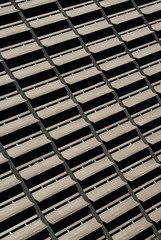
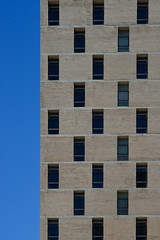
Building vs Blue
Here is an abstract shot I took last year. It is a building found on Ann St in Brisbane, with a nice pattern to its windows, contrasting against the clear blue sky (haven't seen many of those lately!)
This one was taken with the Pentax SMC F 35-70mm f3.5-4.5 lens and Pentax K200D body. It was processed in Lightroom, and then I used The Gimp to apply a small amount of perspective correction. The last step I had to do because I was shooting looking up, so the lines were not quite straight.
Perspective correction basically squeezes 1 end of the photo, to correct the converging lines you get as things get further away. In this shot the line between the building and the sky was sloping slightly from left at the bottom of shot, to right at the top of shot, even though I was cropping the image with the line of windows at the right side straight up and down.
Here is a good example of a much more extreme perspective correction on a shot.
This blog has moved to HERE!
Monday, March 8, 2010
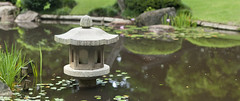
Project 52 - #8 - Japanese Garden, Mt Cootha
I am a little behind, but I hope to catch up this week. We have had rainy weather non stop for a couple weeks now. Yesterday I got out amongst the showers in the Mt Cootha Botanic Gardens, and in particular wanted to visit the Japanese Garden. You can read about the garden here.
Over the last week or so I've been discussing shooting in various different aspect ratios with a friend at work. He had the idea to shoot only in a particular aspect ratio for a bit. After this discussion I decided to copy his idea a little, and try shooting some stuff in the movie aspect ratio of 2.39:1 (my friend has decided on 16:9 btw). This is from my first shoot where I specifically considered shooting in this aspect. I dont plan on taking lots of shots in this aspect ratio, but it is fun to consider.
This is a Brenizer Panorama, taken with my Pentax K200D and Jupiter-9 85mm lens at f2.8. I stitched the shots using Autopano, then did some editing in Lightroom 2.5 to get the final result (crop, contrast, exposure, blacks)
This blog has moved to HERE!
Friday, March 5, 2010
Sunset Reflection Timelapse
Timelapse Fail
Originally uploaded by jezza323
On a more positive note, i have finally found a really good CHDK script for sunset/sunrise timelapses. If you have CHDK look at the CHDK forums, in the scripts section, for the Sunset F16 script. works wonderfully, even if it takes 4-5 shots at the beginning to get the exposure right.
I will set this shot up again tonight, with less reflections (i hope!)
This blog has moved to HERE!
Thursday, March 4, 2010
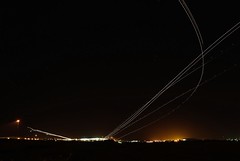
Brisbane Airport in Action
Here is another example of using Startrails.exe for something other than startrails. This shot was taken almost a year ago now, its made of many 30 sec exposures stacked together to get the multiple trails of planes coming in to land, and taking off.
This shot is another example of using startrails for adding elements into a shot
This shot is another example of using startrails for adding elements into a shot
This blog has moved to HERE!
Friday, February 26, 2010
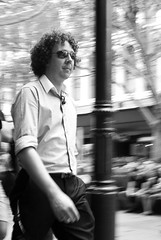
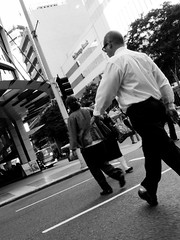
Heading Down The Mall
A panning shot of a speedy walker ;-) Took the DSLR out for some street shots yesterday instead of the little Canon. IQ difference is really something else, lol
Canon is super grainy at ISO 200, this shot at ISO 800 is way better.
Taken with the Pentax K200D and Pentax M 28mm f2.8 at f11, using zone focus method for focusing.
Canon is super grainy at ISO 200, this shot at ISO 800 is way better.
Taken with the Pentax K200D and Pentax M 28mm f2.8 at f11, using zone focus method for focusing.
This blog has moved to HERE!
Thursday, February 25, 2010
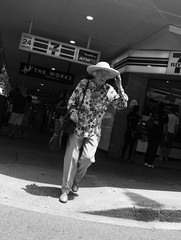
Trudging
Another street shot from yesterday, taken from the hip with the Canon Powershot A590 IS running CHDK, shot in RAW. Was taken at 5.8mm (35mm @ 35mm equivalent), ISO 200, f3.5, 1/500".
I have discovered that the Manual Focus option gets reset as soon as the display goes blank on this camera, will try to work that out...
Today I think I will take the DSLR out for some street shots, provided the rain holds off. I will take the 28mm prime, set to hyperfocal and see what I can come up with.
Processing was the same as the shot I posted last night - Hold On To Your Hat
This blog has moved to HERE!
Blending Time - HDR Photography Part 3
HDR Photography
If you have been following this series, at this point you will have taken some bracketed shots, grouped them together somehow, and then opened Photomatix, and set some options to have your images stacked together. Now we will cover the process of Tone Mapping your image down to 8 bits of information per pixel.
Checking Your Shot
The first thing you need to do is click the Tone Mapping button on the left in Photomatix. This will open the Tone Mapping dialog, with a preview pane to let you see the effect of the changes you are making. Once you have the preview pane available, you should check over it.
The things you need to check for are:
Details Enhancer
Now all you need to do is Tone Map your photo, and you are pretty much done. However this is probably the hardest part of the process. There are just sooo many options, which change the results so much. When I first started I had a basic favourite few settings, and I would jiggle the sliders a little on 2-3 options, and that as about it.
After some time of this, and a bunch of rather boring HDR images, I went googling for some inspiration, and came across this set of "presets" from Stuart (whoever Stuart is!) - Stuart's Photomatix Presets. Now there are quite a lot of presets here, and it has taken me some time to get to grips with them all, but the process I used when I first downloaded them, was to go through, and select each one, and see the result for myself in the preview window. I would then choose the one I thought looked best, and make minor adjustments (usually lower the Colour Saturation, and maybe make it a bit brighter or darker with the White/Black level sliders) and go with that.
Now that I have been using that method for a while, I know what sort of results I can expect from different Presets, so if I know a certain look will work with the image I'm working with, I can go straight to that preset, make some minor adjustments and I am done. I have also created some more Presets of my own. Most of mine are minor adjustments of the downloaded Presets, but they work for me in saving time and effort exploring all those sliders every time.
Tone Compressor
The Tone Compressor method of Tone Mapping is not one I have used very much to be honest... I find I am unable to get a good contrasty image out of it, every time I try I end up with an image with flat colours. It does tend to avoid that nasty halo-ing you get with the more "extreme" Details Enhancer methods though. I used the Tone Compressor method on this Project 52 photo - Project 52 - #1 - It Begins, but as I look back on it now, I do find the colours a little flat. Definately have a play around with this one though, it is far simpler to understand, and if you keep an eye on the Histogram as you make changes you will get a good idea of what each slider does.
- Shooting a HDR
- Getting it off the Camera
- Blending Time
- Final Processing
- Some Inspiration
If you have been following this series, at this point you will have taken some bracketed shots, grouped them together somehow, and then opened Photomatix, and set some options to have your images stacked together. Now we will cover the process of Tone Mapping your image down to 8 bits of information per pixel.
Checking Your Shot
The first thing you need to do is click the Tone Mapping button on the left in Photomatix. This will open the Tone Mapping dialog, with a preview pane to let you see the effect of the changes you are making. Once you have the preview pane available, you should check over it.
The things you need to check for are:
- Alignment issues (even if you didn't use the "Align source images" option, still have a quick check)
- Ghosting issues (black or white "holes" in the image where moving objects appeared)
Details Enhancer
Now all you need to do is Tone Map your photo, and you are pretty much done. However this is probably the hardest part of the process. There are just sooo many options, which change the results so much. When I first started I had a basic favourite few settings, and I would jiggle the sliders a little on 2-3 options, and that as about it.
After some time of this, and a bunch of rather boring HDR images, I went googling for some inspiration, and came across this set of "presets" from Stuart (whoever Stuart is!) - Stuart's Photomatix Presets. Now there are quite a lot of presets here, and it has taken me some time to get to grips with them all, but the process I used when I first downloaded them, was to go through, and select each one, and see the result for myself in the preview window. I would then choose the one I thought looked best, and make minor adjustments (usually lower the Colour Saturation, and maybe make it a bit brighter or darker with the White/Black level sliders) and go with that.
Now that I have been using that method for a while, I know what sort of results I can expect from different Presets, so if I know a certain look will work with the image I'm working with, I can go straight to that preset, make some minor adjustments and I am done. I have also created some more Presets of my own. Most of mine are minor adjustments of the downloaded Presets, but they work for me in saving time and effort exploring all those sliders every time.
Tone Compressor
The Tone Compressor method of Tone Mapping is not one I have used very much to be honest... I find I am unable to get a good contrasty image out of it, every time I try I end up with an image with flat colours. It does tend to avoid that nasty halo-ing you get with the more "extreme" Details Enhancer methods though. I used the Tone Compressor method on this Project 52 photo - Project 52 - #1 - It Begins, but as I look back on it now, I do find the colours a little flat. Definately have a play around with this one though, it is far simpler to understand, and if you keep an eye on the Histogram as you make changes you will get a good idea of what each slider does.
This blog has moved to HERE!
Wednesday, February 24, 2010
Hold On To Your Hat
Another from the hip street shot with the Canon Powershot A590 IS point and shoot. This one was taken at 5.8mm (35mm @ 35mm equivalent), ISO 200, f3.5, 1/800"
Went for a walk down to the Queen St Mall at lunchtime to get some shots, this is one I got on the way. Managed to get a couple of others were decent too.
I even managed to get EXIF on this one! Processed as follows:
Went for a walk down to the Queen St Mall at lunchtime to get some shots, this is one I got on the way. Managed to get a couple of others were decent too.
I even managed to get EXIF on this one! Processed as follows:
- Copied RAWs + JPGs off camera
- Converted to DNG with DNG for Powershot 2
- Imported DNGs to Lightroom 2.5
- Edited in Lightroom 2.5 (contrast, exposure, noise reduction, greyscale)
- Exported to JPG for Web
This blog has moved to HERE!
Tuesday, February 23, 2010
Back to Work With You & Some Tips
Here is the first of a few upcoming street shots taken with the Canon Powershot A590 IS point and shoot digital, running the CHDK software. I am going to try and get my confidence up shooting street with this little camera, before I try getting out with the wider lenses using the DSLR.
I shot this from the hip, using hyperfocal distance and Av (aperture priority mode). The shot lost its EXIF in the RAW conversion (CHDK generates unsupported RAW files) but was taken at 5.8mm (35mm @ 35mm equivalent), ISO 125, f6.3 and 1/60"
By the way, if you want a great read on street photography, check out this fantastic post by "Street Vision", an LA street photographer.
This blog has moved to HERE!
Sunday, February 21, 2010
Timelapse - Video
From My New Toy
Originally uploaded by jezza323
So this was my first go at a timelapse of something interesting. This was filmed? shot?, 1 of those, from my balcony. Unfortunately the script I used didnt allow the camera to go into long exposures as it got dark, so I couldnt use the full set of images I took, but still, this is about 935 shots for this timelapse, taken at 5 second intervals, and pieced together into a 20 fps film. I used Picasa to create the movie.
Enjoy!
This blog has moved to HERE!
Friday, February 19, 2010
Project 52 - #7 - Wellington Point
The sunrise at Wellington Point in Brisbane is a popular location for local photographers. The sun is rising just to the right of frame in this shot, you can see the orange/red glow off the top of the clouds. This is landmark #7 in my Project 52 Brisbane Landmarks for 2010.
Taken with the Pentax K200D and Pentax SMC DA 18-55 AL II @ 18mm, Kenko CPL, TianYa ND8 and TianYa ND8 Grad Filters (thats a whole lotta filters...I didn't need the ND8 but it was already in the holder from an earlier shot).
Single exposure processed in Lightroom 2.5 with exposure graduated mask, clarity, white balance, contrast, exposure and fill lights adjustments.
EDIT: I just realized I had this marked as landmark #6! It is actually landmark #7.
This blog has moved to HERE!
Wednesday, February 17, 2010
Getting It Off The Camera - HDR Photography Part 2
HDR Photography
Now that you have been out and shooting bracketed shots, or bracketed panorama shots, you have at least 3 times as many images on your memory card to deal with. These are the steps I go through when I am getting my shots off the camera and doing the initial viewing in Lightroom.
Import
I import from my card reader using Lightroom's import function. This automatically imports images into my photos folder, under a YYYY\YYYY-MM-DD (ie 2010\2010-01-12) format. You can also ask Lightroom to backup the photos to a 2nd location when importing, very important, and simple to do.

Review
The first thing I do after import, is a quick review of imported images in the Lightroom Library module. I work my way through, viewing every image (only briefly). If I believe a HDR set of 3 (or more) bracketed images is worth processing further, I will select all the images, then I will export each set to its own subfolder, such as "HDR-1" or "HDR-4" as a 16-bit TIFF file (you must not use the compression option for your TIFF files, photomatix does not support it). I then stack the selected images (stacking is a lightroom feature) using the Ctrl+G shortcut. This leaves me with a number of subfolders in my working folder, which need to be processed further. (When doing HDR Panoramas I export all the images into a single folder, ie. "HDR-Pano-1")

Windows Explorer
I will then open up Photomatix on my main monitor (I have a dual monitor setup, with a decent 24" Dell and an old 17" LCD) and Windows Explorer on my 2nd smaller monitor. At this point I will navigate to my first HDR subfolder, select the images I wish to blend in Photomatix, and simply drag and drop them from my Explorer window onto Photomatix.
Photomatix
After dropping some files onto Photomatix, a small dialog asking what you want to do with the images will be displayed. If you wish to just blend them together (as opposed to HDR) then select that, otherwise you will want to choose "Generate an HDR image". You then need to confirm the selected images. Photomatix will then ask you to select some settings to use to generate your HDR.
Generate HDR Settings

I will leave it there for today, in the next post I will cover the Tone Mapping process.
- Shooting a HDR
- Getting it off the Camera
- Blending Time
- Final Processing
- Some Inspiration
Now that you have been out and shooting bracketed shots, or bracketed panorama shots, you have at least 3 times as many images on your memory card to deal with. These are the steps I go through when I am getting my shots off the camera and doing the initial viewing in Lightroom.
Import
I import from my card reader using Lightroom's import function. This automatically imports images into my photos folder, under a YYYY\YYYY-MM-DD (ie 2010\2010-01-12) format. You can also ask Lightroom to backup the photos to a 2nd location when importing, very important, and simple to do.

Review
The first thing I do after import, is a quick review of imported images in the Lightroom Library module. I work my way through, viewing every image (only briefly). If I believe a HDR set of 3 (or more) bracketed images is worth processing further, I will select all the images, then I will export each set to its own subfolder, such as "HDR-1" or "HDR-4" as a 16-bit TIFF file (you must not use the compression option for your TIFF files, photomatix does not support it). I then stack the selected images (stacking is a lightroom feature) using the Ctrl+G shortcut. This leaves me with a number of subfolders in my working folder, which need to be processed further. (When doing HDR Panoramas I export all the images into a single folder, ie. "HDR-Pano-1")

Windows Explorer
I will then open up Photomatix on my main monitor (I have a dual monitor setup, with a decent 24" Dell and an old 17" LCD) and Windows Explorer on my 2nd smaller monitor. At this point I will navigate to my first HDR subfolder, select the images I wish to blend in Photomatix, and simply drag and drop them from my Explorer window onto Photomatix.
Photomatix
After dropping some files onto Photomatix, a small dialog asking what you want to do with the images will be displayed. If you wish to just blend them together (as opposed to HDR) then select that, otherwise you will want to choose "Generate an HDR image". You then need to confirm the selected images. Photomatix will then ask you to select some settings to use to generate your HDR.
Generate HDR Settings
- Align source images - If you were not using a tripod, you should check this box. I usually use the "By matching features" method, but if that does not work, then you should also try the "By correcting horizontal and vertical shifts" method.
- Reduce chromatic abberations - I always leave this checked, as the HDR process enhances any CA in the shot
- Reduce noise - I always leave this one checked too, again because the HDR process enhances any noise in the shot.
- Attempt to reduce ghosting artifacts - If you have some people/cars/boats in your image which move between the seperate shots, you can try using this option to have Photomatix attempt to remove them, however it doesnt always work. If you find it results in black or white sections of the image (obvious blending errors where the moving objects were), you should start again and not select this option, you can always fix it in the final image. For this one I usually try the "Moving objects/people" option, because thats what I'm trying to remove. If you have a tree which blows about in the wind between shots, use the "Background movements" option.

I will leave it there for today, in the next post I will cover the Tone Mapping process.
This blog has moved to HERE!
Tuesday, February 16, 2010
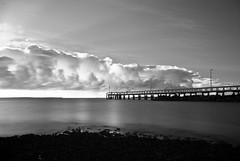
Wellington Point Pier - Hoya R72
Wellington Point Pier at sunrise while the sun was behind a large bank of clouds.
Single exposure taken at 18mm with the Pentax K200D and Pentax SMC DA 18-55 AL II lens. Shot at f8.0, 30 sec, ISO 200.
This shot is Infrared, shot using a Hoya R72 filter. All editing done in Lightroom 2.5 (clarity, blacks, white balance, greyscale, contrast)
I really like the extra contrast you get with the R72 filter. The required long exposure didnt hurt the smoothness of the water either
This blog has moved to HERE!
How to Take a HDR Photo - HDR Photography Part 1
I have had a few people asking me what my process or method for processing HDR images is over the last few days, so here is a detailed run down of how I shoot, process, blend and publish my HDR images. I will split this up into a number of shorter posts, but I will try to get through all the steps as quickly as I can over the next few days.
HDR Photography
HDR stands for High Dynamic Range, and a HDR image is an image where the range of brightness displayed in that single image is more than you would normally get from a single photo. In a HDR image you are compressing really bright stuff, and really dark stuff into a more evenly lit image. By doing so you can make out the detail in the darker areas, and the detail in the bright areas, where normally, you would just see black, or white sections.
There are 2 main ways of shooting a HDR image. The first is to shoot a single frame, and have it saved as a RAW file (RAW files contain a wider range of brightness information for each pixel than a JPEG file). You can then compress the wide range of brightness in that file down into a HDR image. I rarely use this method, as I always shoot RAW anyway, and only use HDR when there is need to capture a wider range of information than a single RAW can capture.
The 2nd method is to shoot multiple frames of the same scene at different exposures, which is called "Bracketing". Most new digital cameras give you the ability to shoot in a bracketing mode. When shooting in this mode, the camera will take 3 (or more) images at varying exposures. By doing so, you are able to capture the detail in the image over a much wider range of brightness. When you blend these 3 (or more) exposures together, you end up with a HDR image. This is the method I use for shooting my HDR images.
Bracketing Shots
If your camera gives you the option to shoot in Bracketing mode, it will often allow you to select the spacing between the exposures of each image. With my Pentax K200D camera, I am able to adjust the exposure brackets from 0.3 EV spacing, up to 2.0 EV spacing, in 1/3 EV steps (0.3, 0.7, 1.0 etc). Most people seem to recommend shooting your brackets at +/- 2.0 EV. This gives a good range of exposure, without going too far apart in your images. When shooting your brackets, it is very helpful to use a tripod. This will prevent any problems in blending the final image due to misalignment of the images, but it also helps to prevent camera shake causing blurry shots, especially for the +2.0 EV shot, as the shutter speed for this shot will be quite slow.
Other Settings
Most of my HDR shots are of buildings/landscapes and other things which do not move and require a large Depth of Field. So when shooting this type of scene I recommend shooting in Aperture Priority mode on your camera, with the aperture set to around f13 or even f16 (where possible, see 2 paragraphs down for why it might not be). Shooting in Av (aperture priority) will give the best control over your depth of field, using aperture priority mode when bracketing means that the camera will only adjust the shutter speed for your brackets. By locking the aperture down, it means the depth of field remains constant throughout the bracketed images.
It is also possible to use Shutter Priority mode for shooting your HDR, however this means the camera will adjust the aperture +/- 2.0 EV stops for each bracket, giving you varying depth of field, which may result in some parts of the scene being out of focus for the +2.0 EV image (where the aperture will be the widest).
A lot of my HDR's are in poor light, so I almost always use ISO 100 with longer exposures to ensure the least possible amount of noise. Something to watch out for though is the 30" (second) maximum shutter time limit on most DSLRs. If you’re 0.0 EV image requires a shutter speed of anything greater than 2 stops less than 30 seconds (7.5" is 2 stops less than 30") it means that your +2.0 EV shot will not be a full 2 stops brighter. For this reason I try to adjust the ISO and aperture until I am able to get the 0.0 EV shot down to at least a 10" shutter speed. By ensuring I have at least 1.7 stops of headroom in shutter speed I am able to use the longer shutter speed shot to get the details out of the darkest areas in the image.
Extra Dynamic Range
n some cases (not very often though) a +/- 2.0 EV bracket does not give enough range in light, and you still have blown out highlights, or blacked out shadows. Some cameras allow you to specify a wider range for bracketing, but my camera does not. So a little trick I have learnt is to use the exposure compensation (or exposure bias) to help fill those ranges. What I do is set the exposure compensation to -2.0 EV, and then shoot a 3 image bracket at +/- 2.0 EV. This results in shots at -4.0 EV, -2.0 EV and 0.0 EV. Then I quickly reset the exposure compensation to +2.0 EV and shoot another 3 image bracket. So in total I have a -4.0 EV, -2.0 EV, 2x 0.0 EV, +2.0 EV and +4.0 EV images. When processing, I simply discard 1 of the 0.0 EV images and blend away.
I hope this helps you get your HDR shot. In the next post I will cover my workflow for processing HDR's up to the tone mapping stage.
HDR Photography
- Shooting a HDR
- Getting it off the Camera
- Blending Time
- Final Processing
- Some Inspiration
HDR stands for High Dynamic Range, and a HDR image is an image where the range of brightness displayed in that single image is more than you would normally get from a single photo. In a HDR image you are compressing really bright stuff, and really dark stuff into a more evenly lit image. By doing so you can make out the detail in the darker areas, and the detail in the bright areas, where normally, you would just see black, or white sections.
There are 2 main ways of shooting a HDR image. The first is to shoot a single frame, and have it saved as a RAW file (RAW files contain a wider range of brightness information for each pixel than a JPEG file). You can then compress the wide range of brightness in that file down into a HDR image. I rarely use this method, as I always shoot RAW anyway, and only use HDR when there is need to capture a wider range of information than a single RAW can capture.
The 2nd method is to shoot multiple frames of the same scene at different exposures, which is called "Bracketing". Most new digital cameras give you the ability to shoot in a bracketing mode. When shooting in this mode, the camera will take 3 (or more) images at varying exposures. By doing so, you are able to capture the detail in the image over a much wider range of brightness. When you blend these 3 (or more) exposures together, you end up with a HDR image. This is the method I use for shooting my HDR images.
Bracketing Shots
If your camera gives you the option to shoot in Bracketing mode, it will often allow you to select the spacing between the exposures of each image. With my Pentax K200D camera, I am able to adjust the exposure brackets from 0.3 EV spacing, up to 2.0 EV spacing, in 1/3 EV steps (0.3, 0.7, 1.0 etc). Most people seem to recommend shooting your brackets at +/- 2.0 EV. This gives a good range of exposure, without going too far apart in your images. When shooting your brackets, it is very helpful to use a tripod. This will prevent any problems in blending the final image due to misalignment of the images, but it also helps to prevent camera shake causing blurry shots, especially for the +2.0 EV shot, as the shutter speed for this shot will be quite slow.
Other Settings
Most of my HDR shots are of buildings/landscapes and other things which do not move and require a large Depth of Field. So when shooting this type of scene I recommend shooting in Aperture Priority mode on your camera, with the aperture set to around f13 or even f16 (where possible, see 2 paragraphs down for why it might not be). Shooting in Av (aperture priority) will give the best control over your depth of field, using aperture priority mode when bracketing means that the camera will only adjust the shutter speed for your brackets. By locking the aperture down, it means the depth of field remains constant throughout the bracketed images.
It is also possible to use Shutter Priority mode for shooting your HDR, however this means the camera will adjust the aperture +/- 2.0 EV stops for each bracket, giving you varying depth of field, which may result in some parts of the scene being out of focus for the +2.0 EV image (where the aperture will be the widest).
A lot of my HDR's are in poor light, so I almost always use ISO 100 with longer exposures to ensure the least possible amount of noise. Something to watch out for though is the 30" (second) maximum shutter time limit on most DSLRs. If you’re 0.0 EV image requires a shutter speed of anything greater than 2 stops less than 30 seconds (7.5" is 2 stops less than 30") it means that your +2.0 EV shot will not be a full 2 stops brighter. For this reason I try to adjust the ISO and aperture until I am able to get the 0.0 EV shot down to at least a 10" shutter speed. By ensuring I have at least 1.7 stops of headroom in shutter speed I am able to use the longer shutter speed shot to get the details out of the darkest areas in the image.
Extra Dynamic Range
n some cases (not very often though) a +/- 2.0 EV bracket does not give enough range in light, and you still have blown out highlights, or blacked out shadows. Some cameras allow you to specify a wider range for bracketing, but my camera does not. So a little trick I have learnt is to use the exposure compensation (or exposure bias) to help fill those ranges. What I do is set the exposure compensation to -2.0 EV, and then shoot a 3 image bracket at +/- 2.0 EV. This results in shots at -4.0 EV, -2.0 EV and 0.0 EV. Then I quickly reset the exposure compensation to +2.0 EV and shoot another 3 image bracket. So in total I have a -4.0 EV, -2.0 EV, 2x 0.0 EV, +2.0 EV and +4.0 EV images. When processing, I simply discard 1 of the 0.0 EV images and blend away.
I hope this helps you get your HDR shot. In the next post I will cover my workflow for processing HDR's up to the tone mapping stage.
This blog has moved to HERE!
Saturday, February 13, 2010
Tips and Tricks From The Web - Street Photography Part 5
I haven't been out shooting any street over the last little while, so instead of giving you my tips and tricks, I will share some I have found on the web. Hopefully they will help me out, and you too.
Street Photography Series
19 Killer Street Photography Tips
The first site with some notable tips I have found is this one. From ILovePhotoBlogs.com. Here are the points that stood out to me.
10 Quick Street Photography Tips
This 2nd link is from a Canon Powershot S90 Street Photography Challenge website. It is just 10 short tips on how to get some street shots. I don't necessarily agree with them all by the way. These are the tips that hit home when I read it.
Street Photography Tips
This is the final link for todays post. There are some really great street shots posted in this forum post, along with some interesting tips.
If you have any good tips please share them with me, ill make sure they get posted up. Best of luck with your street shooting
Street Photography Series
19 Killer Street Photography Tips
The first site with some notable tips I have found is this one. From ILovePhotoBlogs.com. Here are the points that stood out to me.
What is the best lens for street photography?Lens choice is an important technical aspect to street photography, and this tip is something I have seen mentioned more than once (many times in fact).
“I personally like to use a wide lens (24mm, 28mm, 35mm on full frame 35mm) to be pretty close to my subject and get that intimate look of my photos. It took me a while to get closer, so I’d suggest to start with maybe a 75mm or 50mm lens to keep some distance and get closer from there…”
What are the best places to shoot street photography?Choosing somewhere to take street shots is important. You won't get yourself out the door if you don't have somewhere to go in mind.
“At a fair, a midway at a carnival, a sports event, parade, concert or public ceremony, people’s need for personal space and therefore privacy is reduced. The level of sensory stimulation is also usually high at these events, which tends to reduce the need for space. As well, in most of these situations people are having fun so they are more relaxed.”
10 Quick Street Photography Tips
This 2nd link is from a Canon Powershot S90 Street Photography Challenge website. It is just 10 short tips on how to get some street shots. I don't necessarily agree with them all by the way. These are the tips that hit home when I read it.
3. PRE-FRAME. PRE-FOCUS.This is another technique I have seen mentioned a few times. I have tried this out once or twice. If you see a great background or scene, and can imagine a person with a certain look would work well there, then frame up, and wait patiently for someone matching your idea to come by, or you might find someone with a different look that works while you are waiting.
Frame the scene, preset your focus and wait patiently for the right elements to fall into place, before you click. You’ll be surprised at the results of this simple technique.
5. SHOOT FROM THE HIP.Learn to frame your images without looking through the viewfinder or at the LCD. Shoot with the camera away from your face - from the hip or low at your chest work well. Low angle shooting also gives an interesting perspective.Another way to get that candid shot. Most of the street photographers I follow have used this method from time to time. It is worth while learning to aim your camera without looking through the view finder. I am notoriously bad at this myself, but it is something I am working on.
6. OBSERVE. OBSERVE. OBSERVE.Keep your eyes open and be aware of your surroundings. Observe everyone and everything around you. You’ll be surprised at how much is going on in front of you, and how much you can anticipate - ready for that next perfect shot.I believe these 2 tips go hand in hand. You must observe whats going on around you, and you must be patient. A good shot won't come by every 10-15 seconds. Wait for it to make itself available, be prepared, anticipate it, and shoot it.
7. BE PATIENT.Street photography is a test of patience. Either waiting for the scene to evolve or just capturing the right shot, a great photograph takes time to realize. Don't rush that special moment before clicking.
Street Photography Tips
This is the final link for todays post. There are some really great street shots posted in this forum post, along with some interesting tips.
readinessYou must be able to react quickly, part of that is knowing that your equipment is ready, the other part is being ready to react yourself.
learn your camera's controls, shoot in a way that let's you shoot quickly! i'm always pre-set for the most part (choice of iso, aperture) and i typically shoot in aperture priority mode. i also learn the hyperfocal distances of my lenses, so that i can shoot comfortable within a distance range. watch the lighting, which can change by 8 or 9 stops just by turning a corner! it's really important to have all your senses focused on the job at hand
confidenceThe final tip of the day is this one. BE CONFIDENT! This is something I definately suffer from myself, I am shy by nature, so being out in the middle of a group of strangers pointing my camera at them is not comfortable for me, but, I do get out there, and I do try it. The more you do it, the more confident you will get.
street shooting requires confidence.. *you* are doing nothing wrong, so don't sneak around! put away that tele, and stick a fifty or thirty-five on your dslr, or set your digicam's zoom to the wider end of things, and see the scene "normally," up close and personaly. this may be strange for some of you, but i assure you it gets easier after your initial trepidation wears off. the worst that can happen is people say "no, i don't want my photo taken," and so you smile and move on! the wider angles offer so much more to the viewer imo, that they're worth the extra effort in becoming more comfortable ...
If you have any good tips please share them with me, ill make sure they get posted up. Best of luck with your street shooting
This blog has moved to HERE!
Project 52 - #6 - Brisbane General Post Office
The Brisbane General Post Office. Located on Queen St, facing Post Office Square is landmark #6 in my Project 52 Brisbane Landmarks for 2010.
As you can see it is lit up at night with red lights (Australia Post uses a red logo).
I'm not 100% happy with the stitching on this. It is a HDR Panorama (yes again...) composed of 4 HDR images, each HDR is 3 shots at +/- 2.0 EV. Unfortunately 1 of the HDR's came out quite soft for some reason, so the stitching on that 1 is not the best.
This was shot with the Pentax K200D and Pentax SMC DA 18-55 AL II lens at 18mm.
Shoot and Processing was as follows
- Shot in Pentax RAW (PEF), 12 images
- Imported to Lightroom 2.5
- Exported to TIFF
- Blended with Photomatix batch processor, Tone Mapped using Details Enhancer, resulting in 4 TIFF files
- Stitched 4 HDR TIFF files with Autopano, resulting in a single TIFF
- Edited stitched TIFF using Photoshop to correct some perspective distortion, saved to TIFF again
- Imported final TIFF into Lightroom
- Minor edits in Lightroom (contrast, clarity)
- Exported to JPG for Web
This blog has moved to HERE!
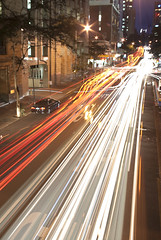
Busy on Adelaide St
This is an example of using Startrail software for something other than star trails. Here I have taken 44 photos from the same location, each with a 6 sec shutter speed, then used startrails.exe to stack all 44 photos together into 1. This gives the sense of speed and action in the shot.
A single 6 sec shot results in maybe 1 or 2 "car trails" which do not travel through the entire shot. If I were to adjust the aperture such that I could get a much longer exposure then the car trails themselves would be dim and barely show up. Also on long exposures noise can become an issue, by stacking the photos, you end up with less noise, although you do get the odd gap in the trails, which you may notice in this shot. This occurs while the shutter is closed between shots.
To make this method of shooting work effectively I would recommend getting a cable remote for your DSLR which has a button lock down feature. This will keep the shutter button locked down, without you having to sit there with your hand on the camera.
This blog has moved to HERE!
Friday, February 12, 2010
St Stephens Chapel - Another Church
The St Stephens chapel was the first catholic church in Queensland. It was completed in 1850. It is located next to the Cathedral of St Stephen on Elizabeth St in Brisbane. The cathedral was built later to cater for a larger congregation.
This shot is another HDR Panorama - as are a lot recently! I think I need to get a wider lens ;-). This shot is composed of 2 portrait orientation HDR's stitched using Autopano. Each HDR is 3 images, shot at +/-2.0 EV and blended using Photomatix Batch Processor using Details Enhancer for tone mapping.
I have had a few enquiries about my HDR processing methods. I will be doing up a detailed step by step post over the weekend to share with everyone, so stay tuned.
This blog has moved to HERE!
Thursday, February 11, 2010
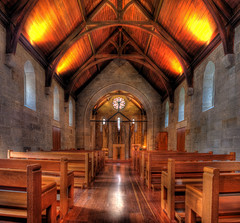
Project 52 - #5 - Cathedral Of St Stephen
This is a 9 shot HDR Panorama of the inside of the Cathedral of St Stephen on Elizabeth St in Brisbane. It is composed of 3 landscape orientation HDR's. Each HDR is 3 shots taken at +/- 2.0 EV. This is landmark #5 in my Project 52 Brisbane Landmarks for 2010.
The shots were taken using my Pentax K200D and Pentax SMC DA 18-55 AL II lens @ 18mm. I also used my tripod to support the setup for the required long exposures.
Processing Details

The shots were taken using my Pentax K200D and Pentax SMC DA 18-55 AL II lens @ 18mm. I also used my tripod to support the setup for the required long exposures.
Processing Details
- Shot in Pentax RAW (PEF)
- Imported into Lightroom 2.5
- Exported 9 images to 16 bit TIFF
- Blended using Photomatix Batch Processing using Details Enhancer for Tone Mapping, this created 3 16 bit TIFF files
- Stitched resulting 3 TIFF's using Autopano
- Rendered to 16 bit TIFF
- Imported stitched TIFF to Lightroom 2.5
- Minor adjustments in Lightroom (crop, tone)
- Exported to JPG for Web
This blog has moved to HERE!
Wednesday, February 10, 2010
Twin Falls, Springbrook National Park
This is a HDR of the Twin Falls waterfalls at Springbrook National Park in the Gold Coast Hinterland. It was a very cloudy and very wet weekend, so I had to use HDR to prevent the sky from blowing out badly.
These falls are quite high and an impressive sight. If the weather were better I would have been keen for a swim in the pool. Maybe next time :-)
This was blended from 5 photos. To get the 5 shots, I set the camera exposure bias to -2.0 EV, then took 3 bracketed shots at /- 2.0 EV (giving -4, -2 and 0 EV) then quickly set the exposure bias to 2.0 EV and took 3 more bracketed shots (giving +4, +2 and 0 EV). I then have shots ranging from -4 to +4 EV in 2 EV steps. I delete 1 of the duplicate 0 EV shots and blend the remaining 5 in Photomatix.
This is a neat little trick if the normal +/- 2.0 EV bracketing is not enough for the scene being shot. In this case the white cloud above the waterfall was blown out in every shot except -4 EV.
This blog has moved to HERE!
Subscribe to:
Posts (Atom)
