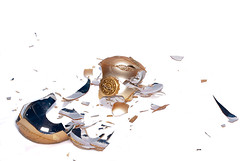
I was trying to capture a decoration in the process of breaking, but unfortunately my timing was never quite good enough. This was the best of the lot though, which I took just after it had broken.
There was a LOT of work in Lightroom 2.5 to complete this photo. The key to doing large area Adjustment Brush work like I did in this photo is to use a LARGE brush, and the Auto Mask feature. Don't be too tempted to use a small brush to get in between things. If you keep the centre of the brush in the right spot, the Auto Masking will take care of the rest!
A before/after comparison in Lightroom
Shooting and PP Details as follows:
- White Nylon backdrop
- Pentax K200D body, firing onboard flash
- Pentax SMC "A" 50mm f1.7 lens @ f22
- Tripod to mount the camera, and a cable remote to fire it
- Sunpak flash with optical trigger and home made diffuser, placed directly above, and slightly behind the subject
- Shot in Pentax RAW (PEF)
- Import into Lightroom 2.5
- Applied large area of adjustment brush to make background more white, area and settings shown below
- Minor basic edits to improve contrast and colour in the broken pieces, shown below
- Edit Detail settings
- Export to JPG For Web


How do you enjoy lightroom? Have you used Photoshop? I for the life of me, can't results like you do with Lightroom.
ReplyDeleteI have used Photoshop, but it totally overwhelms me mostly.
ReplyDelete