This shows how cropping can really change an image (well I think so).
Compare to the original which I blogged a while back. It was just bland shot, with a distracting shed on the left of frame, and you couldnt really see the narrow depth of field, except that the foreground was out of focus.
In this tighter crop, you no longer have the distraction on left of frame, and you can see the sharp outline of the shed and tree as compared to the background.
Sunday, January 17, 2010

Friday, January 15, 2010
Macro Photography Techniques - Part 4
The 4th installment of the macro photography techniques series will cover reversed lenses, and my experience using a reversed lens. A reversed wide angle lens can give very high magnification.
Macro Photography Techniques
The idea behind a reversed lens, is to use a wide lens (I use my Pentax M 28mm) because it is designed to take a large image, and project it onto a small spot (the sensor). If you reverse that lens, it is then taking a small image and projecting it onto a large area. To reverse your lens you will need a reversing adapter. This adapter has a standard lens mount on it, and a thread mount on the other. You need to get a thread mount in the correct size for the lens (or lenses) you wish to reverse. My Pentax M 28mm has a 49mm filter thread, so I needed a 49mm Pentax K reverse mount.
To mount your lens, you simply screw the adapter into the filter thread of your lens, then mount the lens using the adapter's K mount (or whatever mount you are using).
Aperture?
When using a reversed lens, there is no way for the camera to operate the aperture of your lens, so you will want to use a lens which has an aperture ring that allows you to set the desired aperture. Some of the newer digital lenses do not allow this.
The second problem this can cause, is if you want to use a smaller aperture (larger f-stop number) it will be very dark to look through the viewfinder, this can make composing and focusing your shot very difficult. This is one of the drawbacks of using the reversed lens method.
Focusing
This method of macro photography will require a very close working distance. Working distance is distance from the subject to the lens. So be prepared to get down and really get in close to your subjects. The other thing it means is a very very narrow depth of field, sometimes it can be so narrow you will find it hard to get something in focus.
To focus with a reversed lens I still use the handheld, moving back and fowards method I described in Part 1, however, I take many more photos of a single subject than I would using the other methods. This is because the viewfinder is often dark (I try to use the smallest aperture I can get away with) and because the depth of field is so narrow. The hope is that at least 1 of the photos I take of any particular subject will have the focus in the correct position.
Results
Here are a couple of photos taken using this technique. You will notice the high magnification of these subjects, this is the power of the reversed lens.


Macro Photography Techniques
- Close Focus Lens
- Teleconverters
- Extension Tubes
- Reversed Lenses
- Macro Lens
- Combining Techniques
- Close Up Filters
The idea behind a reversed lens, is to use a wide lens (I use my Pentax M 28mm) because it is designed to take a large image, and project it onto a small spot (the sensor). If you reverse that lens, it is then taking a small image and projecting it onto a large area. To reverse your lens you will need a reversing adapter. This adapter has a standard lens mount on it, and a thread mount on the other. You need to get a thread mount in the correct size for the lens (or lenses) you wish to reverse. My Pentax M 28mm has a 49mm filter thread, so I needed a 49mm Pentax K reverse mount.
To mount your lens, you simply screw the adapter into the filter thread of your lens, then mount the lens using the adapter's K mount (or whatever mount you are using).
Aperture?
When using a reversed lens, there is no way for the camera to operate the aperture of your lens, so you will want to use a lens which has an aperture ring that allows you to set the desired aperture. Some of the newer digital lenses do not allow this.
The second problem this can cause, is if you want to use a smaller aperture (larger f-stop number) it will be very dark to look through the viewfinder, this can make composing and focusing your shot very difficult. This is one of the drawbacks of using the reversed lens method.
Focusing
This method of macro photography will require a very close working distance. Working distance is distance from the subject to the lens. So be prepared to get down and really get in close to your subjects. The other thing it means is a very very narrow depth of field, sometimes it can be so narrow you will find it hard to get something in focus.
To focus with a reversed lens I still use the handheld, moving back and fowards method I described in Part 1, however, I take many more photos of a single subject than I would using the other methods. This is because the viewfinder is often dark (I try to use the smallest aperture I can get away with) and because the depth of field is so narrow. The hope is that at least 1 of the photos I take of any particular subject will have the focus in the correct position.
Results
Here are a couple of photos taken using this technique. You will notice the high magnification of these subjects, this is the power of the reversed lens.

reversed 28mm lens, ISO 100, f11 or so from memory, 1/180 sec, onboard flash fired.

Reversed 28mm lens, ISO 400, f4 or 5.6 from memory, 1/400 sec
UPDATE: I have added some shots of my Pentax SMC M 28mm f2.8 lens reverse mounted on my K200D, and a photo of the reversing adapter itself to my Part 5 post
This blog has moved to HERE!
Wednesday, January 13, 2010
Project 52 - #2 - Kurilpa Bridge
This is the 2nd shot for my 2010 Project 52 - "Brisbane Landmarks"
This is the recently completed Kurilpa Bridge, a Pedestrian Bridge from the Brisbane CBD over the Brisbane River to West End/Southbank.
This is a 3 shot HDR, taken with my Pentax K200D and Pentax SMC DA 18-55mm AL II
Base shot was 18mm, ISO 100, f9.0, 5 sec, bracketing was at +/- 2.0 EV
UPDATE - Processing details now posted - sorry for the delay.
Shot and Processed as follows:-
- Shot in Pentax RAW (PEF)
- Imported into Lightroom 2.5
- Exported to 16-bit TIFF
- HDR Generated using Photomatix
- Tone Mapped using Details Enhancer (settings shown below)
- Save-as 16-bit TIFF
- Import into Lightroom 2.5
- Minor editing applied using adjustment brush to remove some unwanted detail on the right of image (brush positioning and settings shown below)
- Increased Blacks and Brightness
- Exported to JPG for Web


This blog has moved to HERE!
Tuesday, January 12, 2010
Bird and Stair Testing the Tair-11a
I have already used this one in my Tair-11a review, but I just have to share again. This shot really works for me.
Taken with the Tair-11a at f2.8 (wide open), ISO 100, 1/640.
Post Processing as follows:-
No editing at all!

- Shot in Pentax RAW (PEF)
- Imported in Lightroom 2.5
- Exported to JPG for Web
This blog has moved to HERE!
Monday, January 11, 2010
Macro Photography Techniques - Part 3
The 3rd installment of the series will cover the use of extension tubes. Again this is a method which requires an extra piece of equipment, but again it is something which can often be acquired quite cheaply.
Macro Photography Techniques
First off, lets talk about what extension tubes are. Extension tubes are a simple device which mounts between the camera body and the lens. They contain no optical elements (where a teleconverter does). All they do is modify the register distance (distance from the lens to the sensor or film plane) which means the minimum focus distance of the lens becomes much less, as does the maximum focus distance for that matter. You can no longer focus to infinity with a lens mounted on extension tubes. Moving the lens further from the sensor or film plane also results in a loss of light. This is why I recommend using a fast lens when using extension tubes. The exact amount of light you will lose will depend on the thickness of the tubes (or how far from the sensor plane you move the lens).
Types of Tubes
There are 2 main types of extension tubes. There are those which operate the lens' aperture mechanism, and those which do not. The most commonly found is the type that do not. These are often sold very cheaply on ebay, and come in 5 parts. A body mount, a lens mount, and 3 extensions of various sizes. These work just fine, however, if you want to stop the lens down (and you will, to get more depth of field) these can become quite hard to use. If you stop down the lens, you will notice the view finder darkens significantly, to the point where focusing, and even just composition of a shot becomes hard or even impossible.
I recommend spending a little extra on your extension tubes, and getting the "Auto" type. This means that the extension tubes allow the camera body to still operate the lens aperture through the tubes. This allows you to focus/compose the shot with the lens wide open (as happens with the lens mounted normally) and then the body closes the aperture just as the shot is taken. I have a set of these extension tubes, made by Vivitar for Pentax K mount.
Bellows?
Bellows, what are they? Bellows are basically a very large, length adjustable extension tube. They allow for heaps of magnification, but are heavy and awkward to use. I have not personally used a set of bellows, nor do I see myself using a set of bellows as I like to be mobile. However, keep them in mind.
Which Lens
As mentioned earlier, I recommend using a fast lens which extension tubes, as it allows you to focus and compose more easily after you have lost light from the tubes themselves. Something to keep in mind is, the shorter the focal length of the lens, the more magnification you get from an extension tube. For example, my extension tubes are sized as follows; 12mm, 20mm and 36mm. If I use the largest tube (36mm) with my 50mm lens, I get extra magnification, but if I use the same tube with my 28mm lens, I will get greater than 1:1 magnification! A good approximate rule is, to get 1:1 use the same length of extension tubes as the focal length of the lens. This guideline only applies to lenses which are not extremely close focusing already (like the CZ Flektogon 35mm f2.4 which already focuses to 1:2 magnification, 35mm of tubes will get greater than 1:1 on this lens).
I have successfully used my 50mm f1.7 lens, 50mm f2.0 lens and 28mm f2.8 lens with extension tubes.
Focusing
As before, focusing is best achieved by moving yourself and the camera and lens closer to, and further away from the subject as required, rather than using the focusing ring. See Part 1 for a full description.
Results
Here are some photos taken using my extension tubes. Dont forget to share yours in the comments


Macro Photography Techniques
- Close Focus Lens
- Teleconverters
- Extension Tubes
- Reversed Lenses
- Macro Lens
- Combining Techniques
- Close Up Filters
First off, lets talk about what extension tubes are. Extension tubes are a simple device which mounts between the camera body and the lens. They contain no optical elements (where a teleconverter does). All they do is modify the register distance (distance from the lens to the sensor or film plane) which means the minimum focus distance of the lens becomes much less, as does the maximum focus distance for that matter. You can no longer focus to infinity with a lens mounted on extension tubes. Moving the lens further from the sensor or film plane also results in a loss of light. This is why I recommend using a fast lens when using extension tubes. The exact amount of light you will lose will depend on the thickness of the tubes (or how far from the sensor plane you move the lens).
Types of Tubes
There are 2 main types of extension tubes. There are those which operate the lens' aperture mechanism, and those which do not. The most commonly found is the type that do not. These are often sold very cheaply on ebay, and come in 5 parts. A body mount, a lens mount, and 3 extensions of various sizes. These work just fine, however, if you want to stop the lens down (and you will, to get more depth of field) these can become quite hard to use. If you stop down the lens, you will notice the view finder darkens significantly, to the point where focusing, and even just composition of a shot becomes hard or even impossible.
I recommend spending a little extra on your extension tubes, and getting the "Auto" type. This means that the extension tubes allow the camera body to still operate the lens aperture through the tubes. This allows you to focus/compose the shot with the lens wide open (as happens with the lens mounted normally) and then the body closes the aperture just as the shot is taken. I have a set of these extension tubes, made by Vivitar for Pentax K mount.
Bellows?
Bellows, what are they? Bellows are basically a very large, length adjustable extension tube. They allow for heaps of magnification, but are heavy and awkward to use. I have not personally used a set of bellows, nor do I see myself using a set of bellows as I like to be mobile. However, keep them in mind.
Which Lens
As mentioned earlier, I recommend using a fast lens which extension tubes, as it allows you to focus and compose more easily after you have lost light from the tubes themselves. Something to keep in mind is, the shorter the focal length of the lens, the more magnification you get from an extension tube. For example, my extension tubes are sized as follows; 12mm, 20mm and 36mm. If I use the largest tube (36mm) with my 50mm lens, I get extra magnification, but if I use the same tube with my 28mm lens, I will get greater than 1:1 magnification! A good approximate rule is, to get 1:1 use the same length of extension tubes as the focal length of the lens. This guideline only applies to lenses which are not extremely close focusing already (like the CZ Flektogon 35mm f2.4 which already focuses to 1:2 magnification, 35mm of tubes will get greater than 1:1 on this lens).
I have successfully used my 50mm f1.7 lens, 50mm f2.0 lens and 28mm f2.8 lens with extension tubes.
Focusing
As before, focusing is best achieved by moving yourself and the camera and lens closer to, and further away from the subject as required, rather than using the focusing ring. See Part 1 for a full description.
Results
Here are some photos taken using my extension tubes. Dont forget to share yours in the comments

50mm f1.7 lens, all 3 extension tubes, ISO 100, 1/180 sec, f11.0, onboard flash. These are aphids, the big one is an ant.

50mm f1.7 lens, 36mm extension tube, ISO 100, 1/180 sec, f11.0, onboard flash
This blog has moved to HERE!
Sunday, January 10, 2010
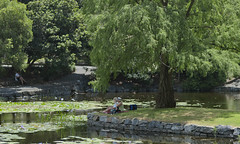
Picnic By the Lake, Under the Tree
This is another Brenizer Panorama I took yesterday at the Mt Cootha Botanic Gardens. Shot with the Pentax K200D and Tair-11a 135mm f2.8 lens, at 2.8.
Shooting and Processing as Follows

Shooting and Processing as Follows
- Shot in Pentax RAW (PEF) - 94 shots
- Import into Lightroom 2.5
- Export to 16 bit TIFF with ZIP compression
- Stitched using Autopano Giga 2
- Rendered to 16 bit TIFF
- Imported into Lightroom 2.5
- Heavy crop (94 images was for a much bigger scene, but I only liked this part of it)
- Edited as shown below (Basic tab only)
- Export to JPG for Web

This blog has moved to HERE!
Friday, January 8, 2010
Macro Photography Techniques - Part 2
This is the 2nd technique I've used when taking macro photos (also the one I've used the most).
Macro Photography Techniques
This technique requires a teleconverter. A teleconverter is an accessory which mounts between your camera and your lens. The effect is increase of focal length. In this case you will probably want a 2x Teleconverter, which is designed to double the effective focal length of your lens. However it does not change the minimum focus distance, so you end up with the same lens, focusing at the same distance, but you get twice the magnification of the image. You can also get Macro Focusing Teleconverters (such as this) which have their own focusing ring, and allow extra magnification, and a good level of control over the magnification.
Drawbacks? Of Course...
The downside of this technique is that a 2x teleconverter, while doubling your effective focal length, it also reduces the effective aperture (incoming light) by 2 stops. So if your kit lens happens to be a Pentax SMC DA 18-55mm f3.5-5.6, and you are wanting to get maximum magnification (55mm @ minimum focus distance) adding a 2x teleconverter will mean that the lens (wide open, where it is a bit softer) becomes 110mm at f11.2. So in order to get a fast shutter speed you will need either high ISO (noisy) or a flash. I have had very good success just using the onboard flash though.
A teleconverter will also exaggerate any quality problems in the lens you are using. If you lens is a bit soft, it will be twice as soft using the 2x teleconverter. So you must be cautious about how you use it. This is where using a flash is also helpful, as it allows you to use a smaller aperture, which will mean the lens is going to be closer to its sweet spot for sharpness.
Another obvious drawback is that you need an extra piece of equipment. I was able to acquire an older 2x teleconverter to fit Pentax K mount on ebay for about $15. It has no "A" contacts (for camera autoexposure) or autofocus. Ideally you would want to have the "A" contacts for auto exposure, however, auto focusing is not required for this technique as you will be using manual focus mode set to minimum focus distance anyway.
Focusing
The same method for focusing is used as for the previous technique. You can read up on that here, in Part 1.
Results
Here are a couple of photos taken using this technique, including settings.


For those of you who already have teleconverters, why not give this technique a try, and post up the results in the comments.
Macro Photography Techniques
- Close Focus Lens
- Teleconverters
- Extension Tubes
- Reversed Lenses
- Macro Lens
- Combining Techniques
- Close Up Filters
This technique requires a teleconverter. A teleconverter is an accessory which mounts between your camera and your lens. The effect is increase of focal length. In this case you will probably want a 2x Teleconverter, which is designed to double the effective focal length of your lens. However it does not change the minimum focus distance, so you end up with the same lens, focusing at the same distance, but you get twice the magnification of the image. You can also get Macro Focusing Teleconverters (such as this) which have their own focusing ring, and allow extra magnification, and a good level of control over the magnification.
Drawbacks? Of Course...
The downside of this technique is that a 2x teleconverter, while doubling your effective focal length, it also reduces the effective aperture (incoming light) by 2 stops. So if your kit lens happens to be a Pentax SMC DA 18-55mm f3.5-5.6, and you are wanting to get maximum magnification (55mm @ minimum focus distance) adding a 2x teleconverter will mean that the lens (wide open, where it is a bit softer) becomes 110mm at f11.2. So in order to get a fast shutter speed you will need either high ISO (noisy) or a flash. I have had very good success just using the onboard flash though.
A teleconverter will also exaggerate any quality problems in the lens you are using. If you lens is a bit soft, it will be twice as soft using the 2x teleconverter. So you must be cautious about how you use it. This is where using a flash is also helpful, as it allows you to use a smaller aperture, which will mean the lens is going to be closer to its sweet spot for sharpness.
Another obvious drawback is that you need an extra piece of equipment. I was able to acquire an older 2x teleconverter to fit Pentax K mount on ebay for about $15. It has no "A" contacts (for camera autoexposure) or autofocus. Ideally you would want to have the "A" contacts for auto exposure, however, auto focusing is not required for this technique as you will be using manual focus mode set to minimum focus distance anyway.
Focusing
The same method for focusing is used as for the previous technique. You can read up on that here, in Part 1.
Results
Here are a couple of photos taken using this technique, including settings.

SMC F 35-70mm @ 70mm (effective 140mm), f11 (effective f22), 1/180 sec, ISO 200, onboard flash

SMC F 35-70mm @ 70mm (effective 140mm), f16 (effective f32), 1/20 sec (this should be shorter), ISO 400, onboard flash

SMC F 35-70mm @ 70mm (effective 140mm), f11 (effective f22), 1/180 sec, ISO 200, onboard flash
For those of you who already have teleconverters, why not give this technique a try, and post up the results in the comments.
This blog has moved to HERE!
Subscribe to:
Posts (Atom)
