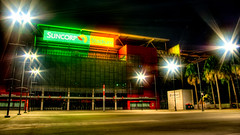
This is the major local football stadium in Brisbane - Suncorp Stadium (previously known as Lang Park). Just a few minutes from the CBD it is the home of 3 major teams competing in national competitions. The Brisbane Broncos (Rugby League), The Queensland Roar (Soccer) and The Queensland Reds (Rugby Union).
This is a HDR composed of 3 shots, taken at +/- 2.0 EV and blended in Photomatix using the Details Enhancer. It is also cropped in a 16:9 ratio.
Showing posts with label hdr. Show all posts
Showing posts with label hdr. Show all posts
Wednesday, March 31, 2010
Thursday, March 25, 2010
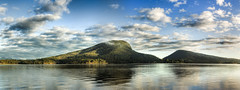
Lake Moogerah Sunrise Again
Here is another HDR Panorama from my Lake Moogerah camping trip. I really like the colour of the sky and the reflections in this.
Let me know what you think!
Let me know what you think!
This blog has moved to HERE!
Friday, March 19, 2010
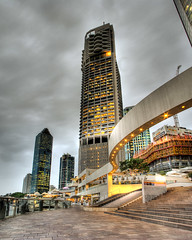
Project 52 - #10 - Brisbane Riverwalk
This is looking down part of the Brisbane Riverwalk. I took this shot from next to the Riverside Centre building, the main building in the shot is the Riparian Plaza and the building at the left is Waterfront Place.
Taken using Pentax K200D, Pentax SMC DA 18-55 AL II and Slik 500 DX Pro Tripod. This is a HDR Panorama, composed of 5 HDR images (I overlapped them a lot), each composed of 3 images shot at +2, 0, -2. Blended and Tone Mapped with Photomatix batch processor using Details Enhancer, and stitched using Autopano.
Taken using Pentax K200D, Pentax SMC DA 18-55 AL II and Slik 500 DX Pro Tripod. This is a HDR Panorama, composed of 5 HDR images (I overlapped them a lot), each composed of 3 images shot at +2, 0, -2. Blended and Tone Mapped with Photomatix batch processor using Details Enhancer, and stitched using Autopano.
This blog has moved to HERE!
Monday, March 15, 2010
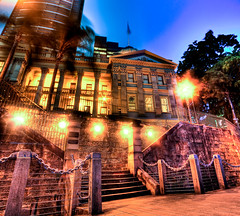
Project 52 - #9 - Old Customs House
This is a shot of the Old Customs House in Brisbane. This is the view from the Brisbane Riverwalk.
This shot is another HDR Panorama, this time blended at stitched from 12 photos. It is stitched from 4 HDR images in a 2x2 layout using Autopano Giga, and each HDR image was shot at +/- 2.0 EV and then blended using Photomatix with the Batch Processing function, using Details Enhancer for Tone Mapping.
Shooting and Processing
- Shot all 12 photos in Pentax RAW (PEF), 4 lots of +/- 2.0 EV brackets
- Imported all images from memory card using Lightroom 2.5
- Exported all 12 photos to a new subfolder as 1bit TIFF files
- Opened Photomatix and ran Batch Process over the new subfolder
- Opened Autopano and selected the 4 resulting TIFF HDR images to stitch
- Rendered the created panorama to another 16-bit TIFF
- Imported final TIFF into Lightroom 2.5
- Edited white balance (its a hard one because the Riverwalk is lit with different colour lights to the lights on Customs House and cropped image
- Exported to JPG for Web
This blog has moved to HERE!
Thursday, February 25, 2010
Blending Time - HDR Photography Part 3
HDR Photography
If you have been following this series, at this point you will have taken some bracketed shots, grouped them together somehow, and then opened Photomatix, and set some options to have your images stacked together. Now we will cover the process of Tone Mapping your image down to 8 bits of information per pixel.
Checking Your Shot
The first thing you need to do is click the Tone Mapping button on the left in Photomatix. This will open the Tone Mapping dialog, with a preview pane to let you see the effect of the changes you are making. Once you have the preview pane available, you should check over it.
The things you need to check for are:
Details Enhancer
Now all you need to do is Tone Map your photo, and you are pretty much done. However this is probably the hardest part of the process. There are just sooo many options, which change the results so much. When I first started I had a basic favourite few settings, and I would jiggle the sliders a little on 2-3 options, and that as about it.
After some time of this, and a bunch of rather boring HDR images, I went googling for some inspiration, and came across this set of "presets" from Stuart (whoever Stuart is!) - Stuart's Photomatix Presets. Now there are quite a lot of presets here, and it has taken me some time to get to grips with them all, but the process I used when I first downloaded them, was to go through, and select each one, and see the result for myself in the preview window. I would then choose the one I thought looked best, and make minor adjustments (usually lower the Colour Saturation, and maybe make it a bit brighter or darker with the White/Black level sliders) and go with that.
Now that I have been using that method for a while, I know what sort of results I can expect from different Presets, so if I know a certain look will work with the image I'm working with, I can go straight to that preset, make some minor adjustments and I am done. I have also created some more Presets of my own. Most of mine are minor adjustments of the downloaded Presets, but they work for me in saving time and effort exploring all those sliders every time.
Tone Compressor
The Tone Compressor method of Tone Mapping is not one I have used very much to be honest... I find I am unable to get a good contrasty image out of it, every time I try I end up with an image with flat colours. It does tend to avoid that nasty halo-ing you get with the more "extreme" Details Enhancer methods though. I used the Tone Compressor method on this Project 52 photo - Project 52 - #1 - It Begins, but as I look back on it now, I do find the colours a little flat. Definately have a play around with this one though, it is far simpler to understand, and if you keep an eye on the Histogram as you make changes you will get a good idea of what each slider does.
- Shooting a HDR
- Getting it off the Camera
- Blending Time
- Final Processing
- Some Inspiration
If you have been following this series, at this point you will have taken some bracketed shots, grouped them together somehow, and then opened Photomatix, and set some options to have your images stacked together. Now we will cover the process of Tone Mapping your image down to 8 bits of information per pixel.
Checking Your Shot
The first thing you need to do is click the Tone Mapping button on the left in Photomatix. This will open the Tone Mapping dialog, with a preview pane to let you see the effect of the changes you are making. Once you have the preview pane available, you should check over it.
The things you need to check for are:
- Alignment issues (even if you didn't use the "Align source images" option, still have a quick check)
- Ghosting issues (black or white "holes" in the image where moving objects appeared)
Details Enhancer
Now all you need to do is Tone Map your photo, and you are pretty much done. However this is probably the hardest part of the process. There are just sooo many options, which change the results so much. When I first started I had a basic favourite few settings, and I would jiggle the sliders a little on 2-3 options, and that as about it.
After some time of this, and a bunch of rather boring HDR images, I went googling for some inspiration, and came across this set of "presets" from Stuart (whoever Stuart is!) - Stuart's Photomatix Presets. Now there are quite a lot of presets here, and it has taken me some time to get to grips with them all, but the process I used when I first downloaded them, was to go through, and select each one, and see the result for myself in the preview window. I would then choose the one I thought looked best, and make minor adjustments (usually lower the Colour Saturation, and maybe make it a bit brighter or darker with the White/Black level sliders) and go with that.
Now that I have been using that method for a while, I know what sort of results I can expect from different Presets, so if I know a certain look will work with the image I'm working with, I can go straight to that preset, make some minor adjustments and I am done. I have also created some more Presets of my own. Most of mine are minor adjustments of the downloaded Presets, but they work for me in saving time and effort exploring all those sliders every time.
Tone Compressor
The Tone Compressor method of Tone Mapping is not one I have used very much to be honest... I find I am unable to get a good contrasty image out of it, every time I try I end up with an image with flat colours. It does tend to avoid that nasty halo-ing you get with the more "extreme" Details Enhancer methods though. I used the Tone Compressor method on this Project 52 photo - Project 52 - #1 - It Begins, but as I look back on it now, I do find the colours a little flat. Definately have a play around with this one though, it is far simpler to understand, and if you keep an eye on the Histogram as you make changes you will get a good idea of what each slider does.
This blog has moved to HERE!
Wednesday, February 17, 2010
Getting It Off The Camera - HDR Photography Part 2
HDR Photography
Now that you have been out and shooting bracketed shots, or bracketed panorama shots, you have at least 3 times as many images on your memory card to deal with. These are the steps I go through when I am getting my shots off the camera and doing the initial viewing in Lightroom.
Import
I import from my card reader using Lightroom's import function. This automatically imports images into my photos folder, under a YYYY\YYYY-MM-DD (ie 2010\2010-01-12) format. You can also ask Lightroom to backup the photos to a 2nd location when importing, very important, and simple to do.

Review
The first thing I do after import, is a quick review of imported images in the Lightroom Library module. I work my way through, viewing every image (only briefly). If I believe a HDR set of 3 (or more) bracketed images is worth processing further, I will select all the images, then I will export each set to its own subfolder, such as "HDR-1" or "HDR-4" as a 16-bit TIFF file (you must not use the compression option for your TIFF files, photomatix does not support it). I then stack the selected images (stacking is a lightroom feature) using the Ctrl+G shortcut. This leaves me with a number of subfolders in my working folder, which need to be processed further. (When doing HDR Panoramas I export all the images into a single folder, ie. "HDR-Pano-1")

Windows Explorer
I will then open up Photomatix on my main monitor (I have a dual monitor setup, with a decent 24" Dell and an old 17" LCD) and Windows Explorer on my 2nd smaller monitor. At this point I will navigate to my first HDR subfolder, select the images I wish to blend in Photomatix, and simply drag and drop them from my Explorer window onto Photomatix.
Photomatix
After dropping some files onto Photomatix, a small dialog asking what you want to do with the images will be displayed. If you wish to just blend them together (as opposed to HDR) then select that, otherwise you will want to choose "Generate an HDR image". You then need to confirm the selected images. Photomatix will then ask you to select some settings to use to generate your HDR.
Generate HDR Settings

I will leave it there for today, in the next post I will cover the Tone Mapping process.
- Shooting a HDR
- Getting it off the Camera
- Blending Time
- Final Processing
- Some Inspiration
Now that you have been out and shooting bracketed shots, or bracketed panorama shots, you have at least 3 times as many images on your memory card to deal with. These are the steps I go through when I am getting my shots off the camera and doing the initial viewing in Lightroom.
Import
I import from my card reader using Lightroom's import function. This automatically imports images into my photos folder, under a YYYY\YYYY-MM-DD (ie 2010\2010-01-12) format. You can also ask Lightroom to backup the photos to a 2nd location when importing, very important, and simple to do.

Review
The first thing I do after import, is a quick review of imported images in the Lightroom Library module. I work my way through, viewing every image (only briefly). If I believe a HDR set of 3 (or more) bracketed images is worth processing further, I will select all the images, then I will export each set to its own subfolder, such as "HDR-1" or "HDR-4" as a 16-bit TIFF file (you must not use the compression option for your TIFF files, photomatix does not support it). I then stack the selected images (stacking is a lightroom feature) using the Ctrl+G shortcut. This leaves me with a number of subfolders in my working folder, which need to be processed further. (When doing HDR Panoramas I export all the images into a single folder, ie. "HDR-Pano-1")

Windows Explorer
I will then open up Photomatix on my main monitor (I have a dual monitor setup, with a decent 24" Dell and an old 17" LCD) and Windows Explorer on my 2nd smaller monitor. At this point I will navigate to my first HDR subfolder, select the images I wish to blend in Photomatix, and simply drag and drop them from my Explorer window onto Photomatix.
Photomatix
After dropping some files onto Photomatix, a small dialog asking what you want to do with the images will be displayed. If you wish to just blend them together (as opposed to HDR) then select that, otherwise you will want to choose "Generate an HDR image". You then need to confirm the selected images. Photomatix will then ask you to select some settings to use to generate your HDR.
Generate HDR Settings
- Align source images - If you were not using a tripod, you should check this box. I usually use the "By matching features" method, but if that does not work, then you should also try the "By correcting horizontal and vertical shifts" method.
- Reduce chromatic abberations - I always leave this checked, as the HDR process enhances any CA in the shot
- Reduce noise - I always leave this one checked too, again because the HDR process enhances any noise in the shot.
- Attempt to reduce ghosting artifacts - If you have some people/cars/boats in your image which move between the seperate shots, you can try using this option to have Photomatix attempt to remove them, however it doesnt always work. If you find it results in black or white sections of the image (obvious blending errors where the moving objects were), you should start again and not select this option, you can always fix it in the final image. For this one I usually try the "Moving objects/people" option, because thats what I'm trying to remove. If you have a tree which blows about in the wind between shots, use the "Background movements" option.

I will leave it there for today, in the next post I will cover the Tone Mapping process.
This blog has moved to HERE!
Tuesday, February 16, 2010
How to Take a HDR Photo - HDR Photography Part 1
I have had a few people asking me what my process or method for processing HDR images is over the last few days, so here is a detailed run down of how I shoot, process, blend and publish my HDR images. I will split this up into a number of shorter posts, but I will try to get through all the steps as quickly as I can over the next few days.
HDR Photography
HDR stands for High Dynamic Range, and a HDR image is an image where the range of brightness displayed in that single image is more than you would normally get from a single photo. In a HDR image you are compressing really bright stuff, and really dark stuff into a more evenly lit image. By doing so you can make out the detail in the darker areas, and the detail in the bright areas, where normally, you would just see black, or white sections.
There are 2 main ways of shooting a HDR image. The first is to shoot a single frame, and have it saved as a RAW file (RAW files contain a wider range of brightness information for each pixel than a JPEG file). You can then compress the wide range of brightness in that file down into a HDR image. I rarely use this method, as I always shoot RAW anyway, and only use HDR when there is need to capture a wider range of information than a single RAW can capture.
The 2nd method is to shoot multiple frames of the same scene at different exposures, which is called "Bracketing". Most new digital cameras give you the ability to shoot in a bracketing mode. When shooting in this mode, the camera will take 3 (or more) images at varying exposures. By doing so, you are able to capture the detail in the image over a much wider range of brightness. When you blend these 3 (or more) exposures together, you end up with a HDR image. This is the method I use for shooting my HDR images.
Bracketing Shots
If your camera gives you the option to shoot in Bracketing mode, it will often allow you to select the spacing between the exposures of each image. With my Pentax K200D camera, I am able to adjust the exposure brackets from 0.3 EV spacing, up to 2.0 EV spacing, in 1/3 EV steps (0.3, 0.7, 1.0 etc). Most people seem to recommend shooting your brackets at +/- 2.0 EV. This gives a good range of exposure, without going too far apart in your images. When shooting your brackets, it is very helpful to use a tripod. This will prevent any problems in blending the final image due to misalignment of the images, but it also helps to prevent camera shake causing blurry shots, especially for the +2.0 EV shot, as the shutter speed for this shot will be quite slow.
Other Settings
Most of my HDR shots are of buildings/landscapes and other things which do not move and require a large Depth of Field. So when shooting this type of scene I recommend shooting in Aperture Priority mode on your camera, with the aperture set to around f13 or even f16 (where possible, see 2 paragraphs down for why it might not be). Shooting in Av (aperture priority) will give the best control over your depth of field, using aperture priority mode when bracketing means that the camera will only adjust the shutter speed for your brackets. By locking the aperture down, it means the depth of field remains constant throughout the bracketed images.
It is also possible to use Shutter Priority mode for shooting your HDR, however this means the camera will adjust the aperture +/- 2.0 EV stops for each bracket, giving you varying depth of field, which may result in some parts of the scene being out of focus for the +2.0 EV image (where the aperture will be the widest).
A lot of my HDR's are in poor light, so I almost always use ISO 100 with longer exposures to ensure the least possible amount of noise. Something to watch out for though is the 30" (second) maximum shutter time limit on most DSLRs. If you’re 0.0 EV image requires a shutter speed of anything greater than 2 stops less than 30 seconds (7.5" is 2 stops less than 30") it means that your +2.0 EV shot will not be a full 2 stops brighter. For this reason I try to adjust the ISO and aperture until I am able to get the 0.0 EV shot down to at least a 10" shutter speed. By ensuring I have at least 1.7 stops of headroom in shutter speed I am able to use the longer shutter speed shot to get the details out of the darkest areas in the image.
Extra Dynamic Range
n some cases (not very often though) a +/- 2.0 EV bracket does not give enough range in light, and you still have blown out highlights, or blacked out shadows. Some cameras allow you to specify a wider range for bracketing, but my camera does not. So a little trick I have learnt is to use the exposure compensation (or exposure bias) to help fill those ranges. What I do is set the exposure compensation to -2.0 EV, and then shoot a 3 image bracket at +/- 2.0 EV. This results in shots at -4.0 EV, -2.0 EV and 0.0 EV. Then I quickly reset the exposure compensation to +2.0 EV and shoot another 3 image bracket. So in total I have a -4.0 EV, -2.0 EV, 2x 0.0 EV, +2.0 EV and +4.0 EV images. When processing, I simply discard 1 of the 0.0 EV images and blend away.
I hope this helps you get your HDR shot. In the next post I will cover my workflow for processing HDR's up to the tone mapping stage.
HDR Photography
- Shooting a HDR
- Getting it off the Camera
- Blending Time
- Final Processing
- Some Inspiration
HDR stands for High Dynamic Range, and a HDR image is an image where the range of brightness displayed in that single image is more than you would normally get from a single photo. In a HDR image you are compressing really bright stuff, and really dark stuff into a more evenly lit image. By doing so you can make out the detail in the darker areas, and the detail in the bright areas, where normally, you would just see black, or white sections.
There are 2 main ways of shooting a HDR image. The first is to shoot a single frame, and have it saved as a RAW file (RAW files contain a wider range of brightness information for each pixel than a JPEG file). You can then compress the wide range of brightness in that file down into a HDR image. I rarely use this method, as I always shoot RAW anyway, and only use HDR when there is need to capture a wider range of information than a single RAW can capture.
The 2nd method is to shoot multiple frames of the same scene at different exposures, which is called "Bracketing". Most new digital cameras give you the ability to shoot in a bracketing mode. When shooting in this mode, the camera will take 3 (or more) images at varying exposures. By doing so, you are able to capture the detail in the image over a much wider range of brightness. When you blend these 3 (or more) exposures together, you end up with a HDR image. This is the method I use for shooting my HDR images.
Bracketing Shots
If your camera gives you the option to shoot in Bracketing mode, it will often allow you to select the spacing between the exposures of each image. With my Pentax K200D camera, I am able to adjust the exposure brackets from 0.3 EV spacing, up to 2.0 EV spacing, in 1/3 EV steps (0.3, 0.7, 1.0 etc). Most people seem to recommend shooting your brackets at +/- 2.0 EV. This gives a good range of exposure, without going too far apart in your images. When shooting your brackets, it is very helpful to use a tripod. This will prevent any problems in blending the final image due to misalignment of the images, but it also helps to prevent camera shake causing blurry shots, especially for the +2.0 EV shot, as the shutter speed for this shot will be quite slow.
Other Settings
Most of my HDR shots are of buildings/landscapes and other things which do not move and require a large Depth of Field. So when shooting this type of scene I recommend shooting in Aperture Priority mode on your camera, with the aperture set to around f13 or even f16 (where possible, see 2 paragraphs down for why it might not be). Shooting in Av (aperture priority) will give the best control over your depth of field, using aperture priority mode when bracketing means that the camera will only adjust the shutter speed for your brackets. By locking the aperture down, it means the depth of field remains constant throughout the bracketed images.
It is also possible to use Shutter Priority mode for shooting your HDR, however this means the camera will adjust the aperture +/- 2.0 EV stops for each bracket, giving you varying depth of field, which may result in some parts of the scene being out of focus for the +2.0 EV image (where the aperture will be the widest).
A lot of my HDR's are in poor light, so I almost always use ISO 100 with longer exposures to ensure the least possible amount of noise. Something to watch out for though is the 30" (second) maximum shutter time limit on most DSLRs. If you’re 0.0 EV image requires a shutter speed of anything greater than 2 stops less than 30 seconds (7.5" is 2 stops less than 30") it means that your +2.0 EV shot will not be a full 2 stops brighter. For this reason I try to adjust the ISO and aperture until I am able to get the 0.0 EV shot down to at least a 10" shutter speed. By ensuring I have at least 1.7 stops of headroom in shutter speed I am able to use the longer shutter speed shot to get the details out of the darkest areas in the image.
Extra Dynamic Range
n some cases (not very often though) a +/- 2.0 EV bracket does not give enough range in light, and you still have blown out highlights, or blacked out shadows. Some cameras allow you to specify a wider range for bracketing, but my camera does not. So a little trick I have learnt is to use the exposure compensation (or exposure bias) to help fill those ranges. What I do is set the exposure compensation to -2.0 EV, and then shoot a 3 image bracket at +/- 2.0 EV. This results in shots at -4.0 EV, -2.0 EV and 0.0 EV. Then I quickly reset the exposure compensation to +2.0 EV and shoot another 3 image bracket. So in total I have a -4.0 EV, -2.0 EV, 2x 0.0 EV, +2.0 EV and +4.0 EV images. When processing, I simply discard 1 of the 0.0 EV images and blend away.
I hope this helps you get your HDR shot. In the next post I will cover my workflow for processing HDR's up to the tone mapping stage.
This blog has moved to HERE!
Saturday, February 13, 2010
Project 52 - #6 - Brisbane General Post Office
The Brisbane General Post Office. Located on Queen St, facing Post Office Square is landmark #6 in my Project 52 Brisbane Landmarks for 2010.
As you can see it is lit up at night with red lights (Australia Post uses a red logo).
I'm not 100% happy with the stitching on this. It is a HDR Panorama (yes again...) composed of 4 HDR images, each HDR is 3 shots at +/- 2.0 EV. Unfortunately 1 of the HDR's came out quite soft for some reason, so the stitching on that 1 is not the best.
This was shot with the Pentax K200D and Pentax SMC DA 18-55 AL II lens at 18mm.
Shoot and Processing was as follows
- Shot in Pentax RAW (PEF), 12 images
- Imported to Lightroom 2.5
- Exported to TIFF
- Blended with Photomatix batch processor, Tone Mapped using Details Enhancer, resulting in 4 TIFF files
- Stitched 4 HDR TIFF files with Autopano, resulting in a single TIFF
- Edited stitched TIFF using Photoshop to correct some perspective distortion, saved to TIFF again
- Imported final TIFF into Lightroom
- Minor edits in Lightroom (contrast, clarity)
- Exported to JPG for Web
This blog has moved to HERE!
Friday, February 12, 2010
St Stephens Chapel - Another Church
The St Stephens chapel was the first catholic church in Queensland. It was completed in 1850. It is located next to the Cathedral of St Stephen on Elizabeth St in Brisbane. The cathedral was built later to cater for a larger congregation.
This shot is another HDR Panorama - as are a lot recently! I think I need to get a wider lens ;-). This shot is composed of 2 portrait orientation HDR's stitched using Autopano. Each HDR is 3 images, shot at +/-2.0 EV and blended using Photomatix Batch Processor using Details Enhancer for tone mapping.
I have had a few enquiries about my HDR processing methods. I will be doing up a detailed step by step post over the weekend to share with everyone, so stay tuned.
This blog has moved to HERE!
Thursday, February 11, 2010
Project 52 - #5 - Cathedral Of St Stephen
This is a 9 shot HDR Panorama of the inside of the Cathedral of St Stephen on Elizabeth St in Brisbane. It is composed of 3 landscape orientation HDR's. Each HDR is 3 shots taken at +/- 2.0 EV. This is landmark #5 in my Project 52 Brisbane Landmarks for 2010.
The shots were taken using my Pentax K200D and Pentax SMC DA 18-55 AL II lens @ 18mm. I also used my tripod to support the setup for the required long exposures.
Processing Details

The shots were taken using my Pentax K200D and Pentax SMC DA 18-55 AL II lens @ 18mm. I also used my tripod to support the setup for the required long exposures.
Processing Details
- Shot in Pentax RAW (PEF)
- Imported into Lightroom 2.5
- Exported 9 images to 16 bit TIFF
- Blended using Photomatix Batch Processing using Details Enhancer for Tone Mapping, this created 3 16 bit TIFF files
- Stitched resulting 3 TIFF's using Autopano
- Rendered to 16 bit TIFF
- Imported stitched TIFF to Lightroom 2.5
- Minor adjustments in Lightroom (crop, tone)
- Exported to JPG for Web
This blog has moved to HERE!
Wednesday, February 10, 2010
Twin Falls, Springbrook National Park
This is a HDR of the Twin Falls waterfalls at Springbrook National Park in the Gold Coast Hinterland. It was a very cloudy and very wet weekend, so I had to use HDR to prevent the sky from blowing out badly.
These falls are quite high and an impressive sight. If the weather were better I would have been keen for a swim in the pool. Maybe next time :-)
This was blended from 5 photos. To get the 5 shots, I set the camera exposure bias to -2.0 EV, then took 3 bracketed shots at /- 2.0 EV (giving -4, -2 and 0 EV) then quickly set the exposure bias to 2.0 EV and took 3 more bracketed shots (giving +4, +2 and 0 EV). I then have shots ranging from -4 to +4 EV in 2 EV steps. I delete 1 of the duplicate 0 EV shots and blend the remaining 5 in Photomatix.
This is a neat little trick if the normal +/- 2.0 EV bracketing is not enough for the scene being shot. In this case the white cloud above the waterfall was blown out in every shot except -4 EV.
This blog has moved to HERE!
Tuesday, February 9, 2010
Antarctic Beech Trees
Here is another HDR Panorama I took at Springbrook National Park on the weekend. These are Antarctic Beech Trees, which are quite rare, as you will notice if you read the wikipedia article. This shot was taken with the K200D, Pentax SMC DA 18-55 AL II kit lens, and Slik 500DX Pro tripod. It was raining lightly when I took the shot. I setup the tripod just on the inside of the fence which protects the trees from the path.
It was because I was so close that this had to be a panorama. I was not able to fit the base of the trees in the shot. I was also forced to use HDR for this shot due to the extremely bright white clouds behind the tree trunks. I did not want to lose the detail in the roots.
The shoot and processing details are as follows
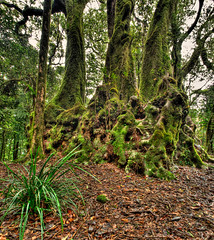
- Shot in Pentax RAW (PEF)
- Imported into Lightroom 2.5
- Exported to 16 bit TIFF
- Exposures blended using Photomatix Batch Processing with Details Enhancer Tone Mapping
- Photomatix resulting images were then stitched using Autopano
- Resulting panorama was imported back into Lightroom 2.5
- Minor adjustments made in Lightroom
- Exported to JPG for Web
This blog has moved to HERE!
Sunday, February 7, 2010
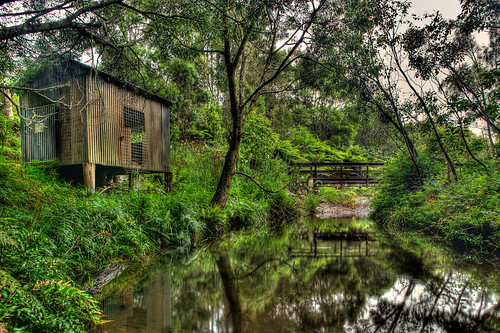
A Rainy Weekend of Camping
I haven't posted for a few days as I was off exploring the world. A friend and I travelled to Springbrook National Park for a weekend of camping and photography, only to discover that the weather was against us. It rained very heavily most of the time, so not much photography happened!
Here are the first of the processed shots though.
This shot was taken using the Pentax DA 18-55 AL II lens @ 18mm. It is 3 HDR images stitched together (HDR's were 3 images each @ +/- 2.0 EV). All shots were taken in Pentax RAW (PEF), imported to Lightroom 2.5, blended using Photomatix batch process with Details Enhancer (quite extreme one too!) and stitched using Autopano.
I also took another HDR panorama from the other side of the shed looking back to the bridge I took this shot from. This is the link to flickr
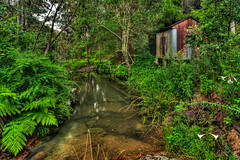
This blog has moved to HERE!
Thursday, January 28, 2010
Project 52 - #4 - Mt Cootha Lookout
This is a 5 shot HDR of the sunrise from Mt Cootha Lookout, which overlooks Brisbane's CBD and surrounding suburbs. This is landmark #4 in my Project 52 Brisbane Landmarks for 2010.
I have already posted this shot on the blog as a general shot with full processing info, so check that out if you are interested

I have already posted this shot on the blog as a general shot with full processing info, so check that out if you are interested
This blog has moved to HERE!
Wednesday, January 27, 2010
Australia Day Sunrise
Happy Australia Day to all the Australians :)
This shot is from a few moments before sunrise yesterday morning (Australia Day, 26th Jan 2010) from the Mt Cootha Lookout in Brisbane. The Brisbane CBD and surrounding suburbs are visible in the shot.
The shot was taken using my Pentax K200D, Pentax DA 18-55 AL II, Slik 500DX Pro tripod and Kenko CPL filter. It is a HDR shot blended from 5 images, taken at -4, -2, 0, +2, +4 EV steps using Photomatix 3.1 and Tone Mapped using the Details Enhancer. I outline how I did this below.
Shots used were all at 18mm, ISO 100 and f13. Shutter speeds were 1/20sec, 1/80sec, 1/5sec, 0.8sec, 3.0sec
Shooting and Processing as follows:
- Shot in Pentax RAW (PEF)
- Set Exposure Compensation to -2.0 EV
- Shot 3 bracketed shots at +/- 2.0 EV (giving -4, -2 and 0 EV shots)
- Set Exposure Compensation to +2.0 EV
- Shot 3 bracketed shots at +/- 2.0 EV (giving +4, +2 and 0 EV shots)
- Imported into Lightroom 2.5
- Applied the settings shown below to all 6 images (the first image)
- Exported all 6 images to full quality JPG
- Deleted the worst of the 2 0 EV shots (this is only 5 images remember!)
- Blended the remaining 5 images in Photomatix
- Tone Mapped in Details Enhancer using the settings show below
- Saved as JPG
- Imported HDR JPG into Lightroom 2.5
- Applied the settings shown below in Lightroom (last image)
- Exported to JPG for Web


This blog has moved to HERE!
Wednesday, January 13, 2010
Project 52 - #2 - Kurilpa Bridge
This is the 2nd shot for my 2010 Project 52 - "Brisbane Landmarks"
This is the recently completed Kurilpa Bridge, a Pedestrian Bridge from the Brisbane CBD over the Brisbane River to West End/Southbank.
This is a 3 shot HDR, taken with my Pentax K200D and Pentax SMC DA 18-55mm AL II
Base shot was 18mm, ISO 100, f9.0, 5 sec, bracketing was at +/- 2.0 EV
UPDATE - Processing details now posted - sorry for the delay.
Shot and Processed as follows:-
- Shot in Pentax RAW (PEF)
- Imported into Lightroom 2.5
- Exported to 16-bit TIFF
- HDR Generated using Photomatix
- Tone Mapped using Details Enhancer (settings shown below)
- Save-as 16-bit TIFF
- Import into Lightroom 2.5
- Minor editing applied using adjustment brush to remove some unwanted detail on the right of image (brush positioning and settings shown below)
- Increased Blacks and Brightness
- Exported to JPG for Web


This blog has moved to HERE!
Thursday, January 7, 2010
Project 52 - #1 - It Begins
Here is the first shot for my 2010 Project 52 which I have decided to use the theme of "Brisbane Landmarks". It is a Nepalese Peace Pagoda located at Southbank in Brisbane, QLD Australia. It was built for Expo '88 and petitioned successfully to remain on the old Expo site (which is now Southbank).
This photo is a HDR, combined from 11 shots. All shots were taken at f16.0 and ISO 100, and shutter speeds were - 1/30, 1/15, 1/8, 1/4, 1/2, 1, 2, 4, 8, 15, 30 secs.
Processing as follows :-


- Shot in Pentax RAW (PEF)
- Imported into Lightroom 2.5
- Shots exported to 16-bit TIFF
- Photomatix generated HDR from 11 16-bit TIFFs
- Photmatix Tone Mapped using Tone Compressor
- Saved as 16-bit TIFF
- Imported new file back to Lightroom 2.5
- Cropped in Lightroom 2
- Edited in Lightroom as shown below (settings not shown were not edited)


This blog has moved to HERE!
Sunday, December 27, 2009
A Late Christmas HDR
Just thought I would share this shot I took on Tuesday 22nd December at King George Square in Brisbane's CBD. This is a 3 shot HDR taken at +/- 2.0 EV steps, in Pentax RAW format (PEF). I took it using a my tripod, K200D and Pentax SMC DA 18-55mm AL II f3.5-5.6 lens with +2.0 EV bias (this means the shots is actually 0 EV +2 EV and +4 EV), no filters. I used the +2 starting EV to get more details from the christmas lights. The base shot settings were f13, 10 secs, ISO 100 in Av (Aperture priority) mode.

Processing was as follows
Lightroom 2.5


Processing was as follows
Lightroom 2.5
- Import
- Export all 3 files as 16-bit TIFF format
- Generate HDR - settings shown below
- Tone Mapped using Details Enhancer method - settings shown below
- Save As 16-bit TIFF
Lightroom
- Import
- Crop (rotated slightly)
- Export to JPG for Web


This blog has moved to HERE!
Subscribe to:
Posts (Atom)
