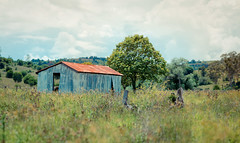
This is a shot I took during the week. I quite like this style of shot, so I thought I would share the preset I used.
The preset is called "PH Fashion Shoot II" and I found it at this site. I recommend downloading this set of presets (even if you don't intend on using them) and just having a look at the settings they contain.
Enjoy!
Saturday, January 30, 2010

Friday, January 29, 2010
Rocks Floating on Clouds
This is an old shot I thought I would share. It may not be immediately obvious to everyone how you get this effect of the cloud-like water.
This effect comes from the movement of the water during a long shutter exposure. In this case it is also accentuated by blending 2 shots together, similar to a HDR.
This was shot using the Pentax K200D and Pentax SMC DA 18-55 AL II lens. I also used TianYa ND8 filter and TianYa ND8 grad filters in a Cokin P holder. These filters block out light, so allow you to use longer shutter speeds, and enhance the cloud-like effect.
To get my 0, -2 EV images which I later blended, I set my camera to bracketing mode, and +/- 2.0 EV steps. I have also set my camera to shoot those steps in 0, -2, +2 order. For this shot the sky was becoming a bit blown out when getting the exposure I was after for the foreground, so I set the base exposure to what I wanted for the foreground, then shot 0 and -2 EV only (I didn't bother shooting the 3rd bracket).
In Photomatix there is the option of "Exposure Blending" as opposed to "Generate HDR". I selected this option, my 2 images, and the Average method.
This blog has moved to HERE!
Street Photography - Progress? - Part 4
Street Photography
So far I've talked about street photography focusing techniques. I haven't had much time to go and put those techniques into practice yet, but I did get 10 mins yesterday lunchtime and 5 mins the previous afternoon on my way to the train station, so lets see how I went
Hyperfocal Distance
This shot was taken with the K200D and Pentax SMC M 28mm f2.8 lens. I set the lens to f11.0, and approximately to hyperfocal distance (I used the Depth of Field scale on the lens focusing ring). I then set the exposure (Pentax M lenses must be shot in manual mode if you want to stop them down). I was then able to take a photo of pretty much anything that was more than about 1.8m away from me, and it should be in focus. This is the shot I took of some workers on their way to the train station. If you go to Flickr and view larger, you will see that the further away from the camera the worse the focus gets. Did I possibly focus too closely to get true hyperfocal distance? Something to work on for next time.

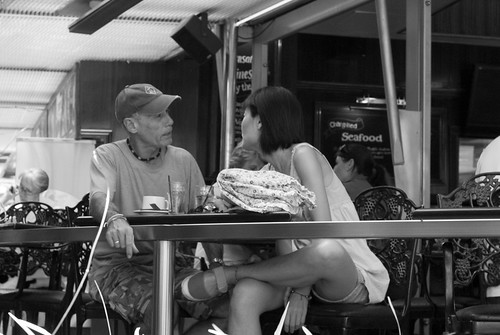
Zone Focusing
This shot was taken with the K200D and the Pentax A 50mm f1.7 lens. The longer focal length of this lens means that the hyperfocal distance is quite far, so you can't get close to the subject, which means you end up cropping the shot to make them the subject of the photo. So when using a longer focal length I recommend using the zone method. I gave this a shot in the pedestrian mall yesterday. I set the lens to f8.0, and the focus to 3m on the focus ring distance scale. This is where I estimated most people would be walking by from where I was positioned. I then proceeded to snap away. This is 1 of the resulting shots. The focus was set a little in front of the couple I was photographing in this shot, so they are slightly out of focus, again something to work on. I will post another image tonight.
So far I've talked about street photography focusing techniques. I haven't had much time to go and put those techniques into practice yet, but I did get 10 mins yesterday lunchtime and 5 mins the previous afternoon on my way to the train station, so lets see how I went
Hyperfocal Distance
This shot was taken with the K200D and Pentax SMC M 28mm f2.8 lens. I set the lens to f11.0, and approximately to hyperfocal distance (I used the Depth of Field scale on the lens focusing ring). I then set the exposure (Pentax M lenses must be shot in manual mode if you want to stop them down). I was then able to take a photo of pretty much anything that was more than about 1.8m away from me, and it should be in focus. This is the shot I took of some workers on their way to the train station. If you go to Flickr and view larger, you will see that the further away from the camera the worse the focus gets. Did I possibly focus too closely to get true hyperfocal distance? Something to work on for next time.
Zone Focusing
This shot was taken with the K200D and the Pentax A 50mm f1.7 lens. The longer focal length of this lens means that the hyperfocal distance is quite far, so you can't get close to the subject, which means you end up cropping the shot to make them the subject of the photo. So when using a longer focal length I recommend using the zone method. I gave this a shot in the pedestrian mall yesterday. I set the lens to f8.0, and the focus to 3m on the focus ring distance scale. This is where I estimated most people would be walking by from where I was positioned. I then proceeded to snap away. This is 1 of the resulting shots. The focus was set a little in front of the couple I was photographing in this shot, so they are slightly out of focus, again something to work on. I will post another image tonight.
This blog has moved to HERE!
Thursday, January 28, 2010
Project 52 - #4 - Mt Cootha Lookout
This is a 5 shot HDR of the sunrise from Mt Cootha Lookout, which overlooks Brisbane's CBD and surrounding suburbs. This is landmark #4 in my Project 52 Brisbane Landmarks for 2010.
I have already posted this shot on the blog as a general shot with full processing info, so check that out if you are interested

I have already posted this shot on the blog as a general shot with full processing info, so check that out if you are interested
This blog has moved to HERE!
Wednesday, January 27, 2010
Hyperfocal Distance - Street Photography Part 3
Street Photography Series
Hyperfocal Distance
The hyperfocal distance is the focus point for any given focal length and aperture combination which gives the largest possible depth of field. Basically zone focus with the biggest possible zone.
How to Find It
Hyperfocal distance can be calculated using an online calculator, or an application such as Photobuddy. Another option (I did this before I got Photobuddy) is to write them down, because the only variables are focal length and aperture you can write down the hyperfocal distance for the most common focal lengths you will use, and each aperture. For example, if I am going shooting with my Pentax M 28mm lens, I know the focal length will be 28mm, and I know I won't be shooting wide apertures without focusing on the subject itself. So what I can do is calculate and write down the hyperfocal distance at f5.6, f8.0, f11.0 and f16.0 as a small reference. The other option you have is to use the DOF scale on your lens (if it has one). This link has a good picture to show how to use the scale to set to hyperfocal distance.
Here is my example hyperfocal chart for a K200D with a 28mm lens (you probably dont actually need near limit written down, but it can be helpful - it is always half of the hyperfocal distance)
Applying Hyperfocal To Street Photography
To apply this method of focusing to your street photography is much like zone focusing. When you calculate your hyperfocal distance, you will know the near limit of acceptable focus. Once you know this, and can judge that distance, you can photograph anything which is at least that far away from you without having to focus on it. All you need to do is set your lens/body to the appropriate f-stop, focal length, and focus distance then start taking shots.
I will post up my results with this technique in the few days. I am waiting for the temps to drop, its been over 30 degrees C here all week!
Hyperfocal Distance
The hyperfocal distance is the focus point for any given focal length and aperture combination which gives the largest possible depth of field. Basically zone focus with the biggest possible zone.
How to Find It
Hyperfocal distance can be calculated using an online calculator, or an application such as Photobuddy. Another option (I did this before I got Photobuddy) is to write them down, because the only variables are focal length and aperture you can write down the hyperfocal distance for the most common focal lengths you will use, and each aperture. For example, if I am going shooting with my Pentax M 28mm lens, I know the focal length will be 28mm, and I know I won't be shooting wide apertures without focusing on the subject itself. So what I can do is calculate and write down the hyperfocal distance at f5.6, f8.0, f11.0 and f16.0 as a small reference. The other option you have is to use the DOF scale on your lens (if it has one). This link has a good picture to show how to use the scale to set to hyperfocal distance.
Here is my example hyperfocal chart for a K200D with a 28mm lens (you probably dont actually need near limit written down, but it can be helpful - it is always half of the hyperfocal distance)
- f5.6 - 6.96m - near limit 3.48m
- f8.0 - 4.93m - near limit 2.465m
- f11.0 - 3.49m - near limit 1.745m
- f16.0 - 2.48m - near limit 1.24m
Applying Hyperfocal To Street Photography
To apply this method of focusing to your street photography is much like zone focusing. When you calculate your hyperfocal distance, you will know the near limit of acceptable focus. Once you know this, and can judge that distance, you can photograph anything which is at least that far away from you without having to focus on it. All you need to do is set your lens/body to the appropriate f-stop, focal length, and focus distance then start taking shots.
I will post up my results with this technique in the few days. I am waiting for the temps to drop, its been over 30 degrees C here all week!
This blog has moved to HERE!
Australia Day Sunrise
Happy Australia Day to all the Australians :)
This shot is from a few moments before sunrise yesterday morning (Australia Day, 26th Jan 2010) from the Mt Cootha Lookout in Brisbane. The Brisbane CBD and surrounding suburbs are visible in the shot.
The shot was taken using my Pentax K200D, Pentax DA 18-55 AL II, Slik 500DX Pro tripod and Kenko CPL filter. It is a HDR shot blended from 5 images, taken at -4, -2, 0, +2, +4 EV steps using Photomatix 3.1 and Tone Mapped using the Details Enhancer. I outline how I did this below.
Shots used were all at 18mm, ISO 100 and f13. Shutter speeds were 1/20sec, 1/80sec, 1/5sec, 0.8sec, 3.0sec
Shooting and Processing as follows:
- Shot in Pentax RAW (PEF)
- Set Exposure Compensation to -2.0 EV
- Shot 3 bracketed shots at +/- 2.0 EV (giving -4, -2 and 0 EV shots)
- Set Exposure Compensation to +2.0 EV
- Shot 3 bracketed shots at +/- 2.0 EV (giving +4, +2 and 0 EV shots)
- Imported into Lightroom 2.5
- Applied the settings shown below to all 6 images (the first image)
- Exported all 6 images to full quality JPG
- Deleted the worst of the 2 0 EV shots (this is only 5 images remember!)
- Blended the remaining 5 images in Photomatix
- Tone Mapped in Details Enhancer using the settings show below
- Saved as JPG
- Imported HDR JPG into Lightroom 2.5
- Applied the settings shown below in Lightroom (last image)
- Exported to JPG for Web


This blog has moved to HERE!
Monday, January 25, 2010
Zone Focusing - Street Photography Part 2
When shooting street photography it is often important to be able to fire off a shot without any delay or hesitation, from yourself, or your gear, to capture that moment of shown emotion or humor or who knows what.
Street Photography Series
Zone Focusing Overview
How to Focus on a Zone - DOF Scale
Many (in fact all the ones I own) older lenses will have a handy DOF scale or guide built into the focus and aperture rings on the lens. This article has a fantastic shot and explanation of how the guide on your lens can help you. As I've said, you need to have a reasonably good judge of distance to use this method, but if you don't, try it out, because you will soon learn to be able to judge the distances better.
Without a DOF Scale
If you are using a lens which does not have a handy DOF guide (most newer lenses do not) you can still use the zone focusing technique, however you will need to pre-calculate your DOF (use the online calculator here), or use an application such as Photobuddy to help you out (this is the what I do).
Does It Work
I have used this technique in the past with my 50mm lens. I set the aperture to f8.0, then focused to 8m on the focusing scale. This gives a DOF of 11m (5.3m to 16.3m) on my K200D (the sensor crop factor does play a factor here!). Then when shooting all you need to do is pick your subjects within that range.
Good luck with your Zone Focusing!
This blog has moved to HERE!
A Gecko on My Windowsill
This is the gecko that came visiting while I was writing the last post in the macro photography series. He was only a baby, probably about 20mm long in total.
I shot this using the reversed 28mm lens mounted to my K200D. I used the on-board flash for some lighting. I took the shot at f22.0, but was unable to focus at f22, so I used my little finger to activate the aperture control lever on the lens (remember it was mounted reverse so you can access it!) to hold the aperture open while I composed and focused the shot. Then released the lever just before firing the shutter.
You can see by the size of the dirt and fibres in the shot that this is at quite high magnification. If you have a good 28 to 35mm lens you can reverse mount I highly recommend buying yourself a cheap reverse adapter and giving it a go. It may take a little while to get used to the short working distance (distance from lens to subject) but you can really get up close with lots of stuff!
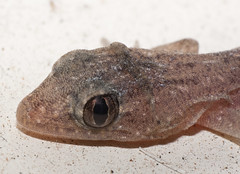
This blog has moved to HERE!
Tips and Attempts - Street Photography Part 1
I have decided to try to get better at shooting some street type stuff. I have done a little of it before, but not very successfully. So this will be the start of another series, this time all about street.
Street Photography Series
I sent Javier (who writes the Street Vision blog) a message the other day asking for some advice on focusing techniques. He suggested using hyperfocal distance and zone focusing, he also suggested I write an article on the subject, which I will when I have experience in using them. This has been a bit of a catalyst for me to try out street shooting again, and write about my experiences, successful and not. I will be posting a number of links in this series as I learn by reading others work, so be prepared for some clicking.
I will start the series with some of my previous attempts at street shooting. I believe most are pretty boring, but they are street shots none the less. Lets see if I can improve the shots as this series goes on!
If you are a street shooter, let me know your tips to include, if you want to share your own street shots, post those too!


This blog has moved to HERE!
Saturday, January 23, 2010
Macro Photography Techniques - Part 6 - The End
This is the 6th and final post in the macro photography techniques thread. Once I get some more results with my external flash macro shots I will add flash information to the series.
Macro Photography Techniques
When I say combining techniques, I'm referring to a few options, I will give each a small write up.
Teleconverters and Reversed Lenses
This is a method I only tried very recently, it gives huge amounts of magnification, very short working distances, but very cool shots are possible. This method involves mounting a teleconverter to your body, then mounting your reversed lens to your teleconverter. You effectively double the magnification you get from the reversed lens setup. The trade offs in this case are, losing 2 stops of light (assuming a 2x teleconverter), short working distance (distance from lens to subject), tiny depth of field and extreme magnification (this makes it hard to frame handheld, as tiny movements result in big shifts in composition). I was put onto this method by this guy. Check out his flickr for some truely amazing macro photography. He combines various techniques involving off camera flash, reversed lenses, teleconverters, bellows, extension tubes and focus stacking.
Extension Tubes or Bellows and Reversed Lenses
This is a similar method to the previous. If you mount your reversed lens onto a set of extension tubes (or bellows), you will increase your magnification. The same trade offs apply as with the previous method, loss of light, shorter working distances, smaller depth of field, and larger magnification. This is not a method I have personally tried, but I know it works as I have seen the results!
Combine The Above
So what about a set of tubes or bellows, then a teleconverter, then a reversed lens? Well imagine the magnification!!!!! But the working distance might become so short, that the subject would actually have to be INSIDE the lens. This is obviously not possible, so take care you aren't going for too much magnification.
What About A Macro Lens?
You can very easily use a macro lens in the above methods, instead of using the reversed lens. Either method (or both) will allow greater than 1:1 magnification for those super close shots.
Would You Believe It?
As I am typing out this post, a baby gecko appeared on my window sill. Naturally (with macro on the mind) I grabbed the camera off the desk, grabbed the 28mm with reverse adapter already mounted from the drawer and took his photo. I will be sure to post the shot when I am able to process it fully. As a side note, I discovered a new little trick. It will work with K mount lenses, but I'm not sure if it will work with others. On the back of the lens is a small lever, this is what the body uses to actuate the aperture for wide open focusing, stop down shooting. If you are careful about how you hold the lens, you are able to actuate this lever with a finger, to give the same effect. The gecko was sitting on a white windowsill, with a very close working distance and onboard flash at full power (it always fires full power with non "A" lenses) I needed to stop all the way down to f22.0. At f22.0 the viewfinder is basically completely black so this little trick allowed me to get the shot I wanted.
Result
Here is a shot I took using a reverse mounted 28mm lens, a 2x teleconverter, and the onboard flash. This insect was less than 10mm long, so you see the huge magnification this combination allows.

The End
Thanks for reading the final post in this series (for now). If there are other methods you would like me to cover then let me know however you can, and I'll get onto it! And don't forget to keep an eye out for some shots of the baby gecko.
Macro Photography Techniques
- Close Focus Lens
- Teleconverters
- Extension Tubes
- Reversed Lenses
- Macro Lens
- Combining Techniques
- Close Up Filters
When I say combining techniques, I'm referring to a few options, I will give each a small write up.
Teleconverters and Reversed Lenses
This is a method I only tried very recently, it gives huge amounts of magnification, very short working distances, but very cool shots are possible. This method involves mounting a teleconverter to your body, then mounting your reversed lens to your teleconverter. You effectively double the magnification you get from the reversed lens setup. The trade offs in this case are, losing 2 stops of light (assuming a 2x teleconverter), short working distance (distance from lens to subject), tiny depth of field and extreme magnification (this makes it hard to frame handheld, as tiny movements result in big shifts in composition). I was put onto this method by this guy. Check out his flickr for some truely amazing macro photography. He combines various techniques involving off camera flash, reversed lenses, teleconverters, bellows, extension tubes and focus stacking.
Extension Tubes or Bellows and Reversed Lenses
This is a similar method to the previous. If you mount your reversed lens onto a set of extension tubes (or bellows), you will increase your magnification. The same trade offs apply as with the previous method, loss of light, shorter working distances, smaller depth of field, and larger magnification. This is not a method I have personally tried, but I know it works as I have seen the results!
Combine The Above
So what about a set of tubes or bellows, then a teleconverter, then a reversed lens? Well imagine the magnification!!!!! But the working distance might become so short, that the subject would actually have to be INSIDE the lens. This is obviously not possible, so take care you aren't going for too much magnification.
What About A Macro Lens?
You can very easily use a macro lens in the above methods, instead of using the reversed lens. Either method (or both) will allow greater than 1:1 magnification for those super close shots.
Would You Believe It?
As I am typing out this post, a baby gecko appeared on my window sill. Naturally (with macro on the mind) I grabbed the camera off the desk, grabbed the 28mm with reverse adapter already mounted from the drawer and took his photo. I will be sure to post the shot when I am able to process it fully. As a side note, I discovered a new little trick. It will work with K mount lenses, but I'm not sure if it will work with others. On the back of the lens is a small lever, this is what the body uses to actuate the aperture for wide open focusing, stop down shooting. If you are careful about how you hold the lens, you are able to actuate this lever with a finger, to give the same effect. The gecko was sitting on a white windowsill, with a very close working distance and onboard flash at full power (it always fires full power with non "A" lenses) I needed to stop all the way down to f22.0. At f22.0 the viewfinder is basically completely black so this little trick allowed me to get the shot I wanted.
Result
Here is a shot I took using a reverse mounted 28mm lens, a 2x teleconverter, and the onboard flash. This insect was less than 10mm long, so you see the huge magnification this combination allows.

ISO 100, probably around f16 aperture, 1/180 sec, onboard flash
The End
Thanks for reading the final post in this series (for now). If there are other methods you would like me to cover then let me know however you can, and I'll get onto it! And don't forget to keep an eye out for some shots of the baby gecko.
This blog has moved to HERE!
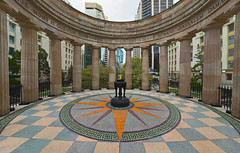
Project 52 - #3 - Anzac Square Eternal Flame AGAIN!
I re-did this shot yesterday afternoon. It was a bit overcast so there are no shadows, and thats why the sky is white. No stitching errors this time! (that you can notice at this size).
This is a Brenizer Panorama, stitched from 181 shots using Autopano. The final edit is 123 megapixels. I could have rendered it larger, but its hard enough to work with at this size!
Shot with Pentax K200D and Jupiter-9 85mm f2.0 @ f2.8. Shot handheld, this time I made a conscious effort to keep my body still while shooting, to avoid the stitching errors I got the first time I shot.
I am much happier with this shot, so I will use it as my Project 52 shot for Week 3.
This blog has moved to HERE!
Thursday, January 21, 2010
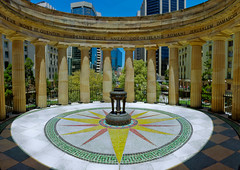
Project 52 - #3 - Anzac Square Eternal Flame
This is a Brenizer Panorama of the Eternal Flame in Anzac Square, Brisbane. This is landmark #3 in my Project 52 Brisbane Landmarks for 2010.
Taken with my K200D and Jupiter-9 85mm f2.0 lens @ f2.8. It is made up of 204 stitched images (it took a while to shoot it)
Unfortunately the exposure is a bit off (i was shooting in jpeg so i didnt fill up the card too much with 1 photo), and i got some parallax error in the stitch around the pillars above the flame. The midday lighting was also not ideal.
I am going to re-do this shot tomorrow afternoon to try and get a better version. I will update this with the results
This blog has moved to HERE!
Brenizer Panorama Stitching Woes...
I am sitting here trying to process my Project 52 #3 photo, and it seems I failed at taking a good panorama. I have got numerous stitching errors in my Brenizer effect shot. I guess I must not have been still enough when taking the shots...
Some things just are not lining up...
Oh well, I guess Project 52 #3 may be a little delayed! I might have to take my tripod in, and try again another day.
FRUSTRATED!
Some things just are not lining up...
Oh well, I guess Project 52 #3 may be a little delayed! I might have to take my tripod in, and try again another day.
FRUSTRATED!
This blog has moved to HERE!
Wednesday, January 20, 2010
Macro Photography Techniques - Part 5
This post in my macro techniques series will cover the other methods, which I haven't covered yet. But first here are a couple of pictures of a reversed lens (a Pentax SMC "M" 28mm f2.8) mounted on my K200D, and a picture of the reverse mount adapter.


Macro Photography Techniques
There are of course other methods of taking macro photos, which I have not yet covered, the main reason for that is I have not tried them! I don't want to limit your macro photography methods just by what I've done.
A Macro Lens
The most obvious technique I have not mentioned is a true macro lens. A macro lens is a lens which allows 1:1 magnification. Some popular examples are the Tamron 90mm f2.8 Macro, Sigma 105mm f2.8 Macro, Pentax D-FA 100mm f2.8 Macro, Sigma 70mm f2.8 Macro, Canon 60mm f2.8 Macro, Canon 100mm f2.8 Macro and so on. There are also many very good older options, which are manual focus only, so do some research before you buy into this option. The only real downside to this option is the cost. A good Macro lens will set you back at least $300 (even for a manual focus one). This is the only reason I haven't got 1 myself, although it is on the "One Day" list.
When using a full macro lens the same focusing techniques can be applied. You can set the focus on the lens to the magnification you want (1:1 or 2:1 etc) then physically move closer to, or further from your subject until it is in focus. If your macro lens has Autofocus, this can be of some help, but remember when working with extreme close up photography, the Depth of Field is VERY small, so a slight movement of the camera after focusing can result in out of focus photos. Also the Autofocus sensor in your camera may report the centre to be in focus, but what is really in the centre of the shot? Is it the eyes of your insect subject, or just its wing? For this reason I would still recommend manual focus.
The Good
The good thing about this option is its very simple to use, and you get a great portrait lens for free! (although some may argue macro lenses are a bit TOO sharp for portraits...). It means you can concentrate more on your composition, finding the things to photograph and perfecting your exposure.
Aperture and Flash Again
Again with a macro lens, you will have a very narrow depth of field, as you are so close to the subject. This means you will want to be using a very small aperture, probably around f22 in a lot of cases. So a flash is always a good option. A tall hot-shoe mounted flash pointing down at the subject can work well, or you could point it up and use a reflector of some kind to direct the light output down towards the subject. Another option is to use an off camera flash, off to the side of the subject, again either pointed down towards it, or up with a reflector. If pointing the flash directly at the subject, a large diffuser of some kind is a good option to soften the light and shadows cast.
Examples?
As I have already mentioned, this isnt a method I have used, as I don't have, or have access to a macro lens. The best I can do is post a shot I took with a friend's Carl Ziess Flektogon 35mm f2.4 lens, which focuses down to 2:1 magnification. I borrowed the lens for a walk in the Roma St Parklands, while composing another shot, this fly landed right next to me on the wall I was sitting on, so he became the new subject.

Get out shooting, and enjoy!


Macro Photography Techniques
- Close Focus Lens
- Teleconverters
- Extension Tubes
- Reversed Lenses
- Macro Lens
- Combining Techniques
- Close Up Filters
There are of course other methods of taking macro photos, which I have not yet covered, the main reason for that is I have not tried them! I don't want to limit your macro photography methods just by what I've done.
A Macro Lens
The most obvious technique I have not mentioned is a true macro lens. A macro lens is a lens which allows 1:1 magnification. Some popular examples are the Tamron 90mm f2.8 Macro, Sigma 105mm f2.8 Macro, Pentax D-FA 100mm f2.8 Macro, Sigma 70mm f2.8 Macro, Canon 60mm f2.8 Macro, Canon 100mm f2.8 Macro and so on. There are also many very good older options, which are manual focus only, so do some research before you buy into this option. The only real downside to this option is the cost. A good Macro lens will set you back at least $300 (even for a manual focus one). This is the only reason I haven't got 1 myself, although it is on the "One Day" list.
When using a full macro lens the same focusing techniques can be applied. You can set the focus on the lens to the magnification you want (1:1 or 2:1 etc) then physically move closer to, or further from your subject until it is in focus. If your macro lens has Autofocus, this can be of some help, but remember when working with extreme close up photography, the Depth of Field is VERY small, so a slight movement of the camera after focusing can result in out of focus photos. Also the Autofocus sensor in your camera may report the centre to be in focus, but what is really in the centre of the shot? Is it the eyes of your insect subject, or just its wing? For this reason I would still recommend manual focus.
The Good
The good thing about this option is its very simple to use, and you get a great portrait lens for free! (although some may argue macro lenses are a bit TOO sharp for portraits...). It means you can concentrate more on your composition, finding the things to photograph and perfecting your exposure.
Aperture and Flash Again
Again with a macro lens, you will have a very narrow depth of field, as you are so close to the subject. This means you will want to be using a very small aperture, probably around f22 in a lot of cases. So a flash is always a good option. A tall hot-shoe mounted flash pointing down at the subject can work well, or you could point it up and use a reflector of some kind to direct the light output down towards the subject. Another option is to use an off camera flash, off to the side of the subject, again either pointed down towards it, or up with a reflector. If pointing the flash directly at the subject, a large diffuser of some kind is a good option to soften the light and shadows cast.
Examples?
As I have already mentioned, this isnt a method I have used, as I don't have, or have access to a macro lens. The best I can do is post a shot I took with a friend's Carl Ziess Flektogon 35mm f2.4 lens, which focuses down to 2:1 magnification. I borrowed the lens for a walk in the Roma St Parklands, while composing another shot, this fly landed right next to me on the wall I was sitting on, so he became the new subject.

Carl Ziess 35mm f2.4 @ f4.0, ISO 100, 1/1000 sec, minimum focus distance (2:1 magnification)
Get out shooting, and enjoy!
This blog has moved to HERE!
Tuesday, January 19, 2010
A Broken Christmas
I took this shot to enter in my workplace monthly photo comp in Decemeber. The theme for the month was "Broken". Being Christmas time I got into the spirit and broke some tree decorations.
I was trying to capture a decoration in the process of breaking, but unfortunately my timing was never quite good enough. This was the best of the lot though, which I took just after it had broken.
There was a LOT of work in Lightroom 2.5 to complete this photo. The key to doing large area Adjustment Brush work like I did in this photo is to use a LARGE brush, and the Auto Mask feature. Don't be too tempted to use a small brush to get in between things. If you keep the centre of the brush in the right spot, the Auto Masking will take care of the rest!

Shooting and PP Details as follows:


I was trying to capture a decoration in the process of breaking, but unfortunately my timing was never quite good enough. This was the best of the lot though, which I took just after it had broken.
There was a LOT of work in Lightroom 2.5 to complete this photo. The key to doing large area Adjustment Brush work like I did in this photo is to use a LARGE brush, and the Auto Mask feature. Don't be too tempted to use a small brush to get in between things. If you keep the centre of the brush in the right spot, the Auto Masking will take care of the rest!

A before/after comparison in Lightroom
Shooting and PP Details as follows:
- White Nylon backdrop
- Pentax K200D body, firing onboard flash
- Pentax SMC "A" 50mm f1.7 lens @ f22
- Tripod to mount the camera, and a cable remote to fire it
- Sunpak flash with optical trigger and home made diffuser, placed directly above, and slightly behind the subject
- Shot in Pentax RAW (PEF)
- Import into Lightroom 2.5
- Applied large area of adjustment brush to make background more white, area and settings shown below
- Minor basic edits to improve contrast and colour in the broken pieces, shown below
- Edit Detail settings
- Export to JPG For Web


This blog has moved to HERE!
Monday, January 18, 2010
Jupiter 9 Review - 85mm f2.0
I received my Jupiter-9 lens in the mail about 1.5 weeks ago, and I finally had a chance to use it yesterday. The Jupiter-9 is a lens made in Russia, available in various mounts (mine is M42, easy to use on most DSLRs), its 85mm focal length, and wide aperture of f2.0 make it a fine lens for portrait photography.
It seems to be selling for around $120USD or so (plus shipping) on Ebay these days. I paid about $140AU total for mine, as I wanted a good condition example, and this particular example included the plastic hard case, both caps, and a lens in reportedly excellent condition. I was not disappointed when it arrived, the condition was like new. For anyone interested the seller was petersburg_deals. Shipment was quite quick considering it was from Russia.
Down to the lens itself. I find it to be very sharp, but I have only tested at f2.8 and f4.0 so far. Most reviews say the lens is a little soft at f2.0, but the kind of softness that works great in portrait photography. I find the colours to be great, let me know what you think. Here are the first lot of test shots.

Very first shot with the lens mounted on my K200D. A friends free promotional mug at work. This is at f2.0, but doesn't give a good indication of sharpness.

This is an f2.8 test shot, unfortunately the light was very uneven, but you can see the lens is sharp.

This is a 100% crop from the previous image, showing how sharp the image is. No post processing sharpening has been applied (click the image to view at original size).
This blog has moved to HERE!
Sunday, January 17, 2010
Brenizer Shed Recrop
This shows how cropping can really change an image (well I think so).
Compare to the original which I blogged a while back. It was just bland shot, with a distracting shed on the left of frame, and you couldnt really see the narrow depth of field, except that the foreground was out of focus.
In this tighter crop, you no longer have the distraction on left of frame, and you can see the sharp outline of the shed and tree as compared to the background.
This blog has moved to HERE!
Friday, January 15, 2010
Macro Photography Techniques - Part 4
The 4th installment of the macro photography techniques series will cover reversed lenses, and my experience using a reversed lens. A reversed wide angle lens can give very high magnification.
Macro Photography Techniques
The idea behind a reversed lens, is to use a wide lens (I use my Pentax M 28mm) because it is designed to take a large image, and project it onto a small spot (the sensor). If you reverse that lens, it is then taking a small image and projecting it onto a large area. To reverse your lens you will need a reversing adapter. This adapter has a standard lens mount on it, and a thread mount on the other. You need to get a thread mount in the correct size for the lens (or lenses) you wish to reverse. My Pentax M 28mm has a 49mm filter thread, so I needed a 49mm Pentax K reverse mount.
To mount your lens, you simply screw the adapter into the filter thread of your lens, then mount the lens using the adapter's K mount (or whatever mount you are using).
Aperture?
When using a reversed lens, there is no way for the camera to operate the aperture of your lens, so you will want to use a lens which has an aperture ring that allows you to set the desired aperture. Some of the newer digital lenses do not allow this.
The second problem this can cause, is if you want to use a smaller aperture (larger f-stop number) it will be very dark to look through the viewfinder, this can make composing and focusing your shot very difficult. This is one of the drawbacks of using the reversed lens method.
Focusing
This method of macro photography will require a very close working distance. Working distance is distance from the subject to the lens. So be prepared to get down and really get in close to your subjects. The other thing it means is a very very narrow depth of field, sometimes it can be so narrow you will find it hard to get something in focus.
To focus with a reversed lens I still use the handheld, moving back and fowards method I described in Part 1, however, I take many more photos of a single subject than I would using the other methods. This is because the viewfinder is often dark (I try to use the smallest aperture I can get away with) and because the depth of field is so narrow. The hope is that at least 1 of the photos I take of any particular subject will have the focus in the correct position.
Results
Here are a couple of photos taken using this technique. You will notice the high magnification of these subjects, this is the power of the reversed lens.


Macro Photography Techniques
- Close Focus Lens
- Teleconverters
- Extension Tubes
- Reversed Lenses
- Macro Lens
- Combining Techniques
- Close Up Filters
The idea behind a reversed lens, is to use a wide lens (I use my Pentax M 28mm) because it is designed to take a large image, and project it onto a small spot (the sensor). If you reverse that lens, it is then taking a small image and projecting it onto a large area. To reverse your lens you will need a reversing adapter. This adapter has a standard lens mount on it, and a thread mount on the other. You need to get a thread mount in the correct size for the lens (or lenses) you wish to reverse. My Pentax M 28mm has a 49mm filter thread, so I needed a 49mm Pentax K reverse mount.
To mount your lens, you simply screw the adapter into the filter thread of your lens, then mount the lens using the adapter's K mount (or whatever mount you are using).
Aperture?
When using a reversed lens, there is no way for the camera to operate the aperture of your lens, so you will want to use a lens which has an aperture ring that allows you to set the desired aperture. Some of the newer digital lenses do not allow this.
The second problem this can cause, is if you want to use a smaller aperture (larger f-stop number) it will be very dark to look through the viewfinder, this can make composing and focusing your shot very difficult. This is one of the drawbacks of using the reversed lens method.
Focusing
This method of macro photography will require a very close working distance. Working distance is distance from the subject to the lens. So be prepared to get down and really get in close to your subjects. The other thing it means is a very very narrow depth of field, sometimes it can be so narrow you will find it hard to get something in focus.
To focus with a reversed lens I still use the handheld, moving back and fowards method I described in Part 1, however, I take many more photos of a single subject than I would using the other methods. This is because the viewfinder is often dark (I try to use the smallest aperture I can get away with) and because the depth of field is so narrow. The hope is that at least 1 of the photos I take of any particular subject will have the focus in the correct position.
Results
Here are a couple of photos taken using this technique. You will notice the high magnification of these subjects, this is the power of the reversed lens.

reversed 28mm lens, ISO 100, f11 or so from memory, 1/180 sec, onboard flash fired.

Reversed 28mm lens, ISO 400, f4 or 5.6 from memory, 1/400 sec
UPDATE: I have added some shots of my Pentax SMC M 28mm f2.8 lens reverse mounted on my K200D, and a photo of the reversing adapter itself to my Part 5 post
This blog has moved to HERE!
Wednesday, January 13, 2010
Project 52 - #2 - Kurilpa Bridge
This is the 2nd shot for my 2010 Project 52 - "Brisbane Landmarks"
This is the recently completed Kurilpa Bridge, a Pedestrian Bridge from the Brisbane CBD over the Brisbane River to West End/Southbank.
This is a 3 shot HDR, taken with my Pentax K200D and Pentax SMC DA 18-55mm AL II
Base shot was 18mm, ISO 100, f9.0, 5 sec, bracketing was at +/- 2.0 EV
UPDATE - Processing details now posted - sorry for the delay.
Shot and Processed as follows:-
- Shot in Pentax RAW (PEF)
- Imported into Lightroom 2.5
- Exported to 16-bit TIFF
- HDR Generated using Photomatix
- Tone Mapped using Details Enhancer (settings shown below)
- Save-as 16-bit TIFF
- Import into Lightroom 2.5
- Minor editing applied using adjustment brush to remove some unwanted detail on the right of image (brush positioning and settings shown below)
- Increased Blacks and Brightness
- Exported to JPG for Web


This blog has moved to HERE!
Tuesday, January 12, 2010
Bird and Stair Testing the Tair-11a
I have already used this one in my Tair-11a review, but I just have to share again. This shot really works for me.
Taken with the Tair-11a at f2.8 (wide open), ISO 100, 1/640.
Post Processing as follows:-
No editing at all!

- Shot in Pentax RAW (PEF)
- Imported in Lightroom 2.5
- Exported to JPG for Web
This blog has moved to HERE!
Monday, January 11, 2010
Macro Photography Techniques - Part 3
The 3rd installment of the series will cover the use of extension tubes. Again this is a method which requires an extra piece of equipment, but again it is something which can often be acquired quite cheaply.
Macro Photography Techniques
First off, lets talk about what extension tubes are. Extension tubes are a simple device which mounts between the camera body and the lens. They contain no optical elements (where a teleconverter does). All they do is modify the register distance (distance from the lens to the sensor or film plane) which means the minimum focus distance of the lens becomes much less, as does the maximum focus distance for that matter. You can no longer focus to infinity with a lens mounted on extension tubes. Moving the lens further from the sensor or film plane also results in a loss of light. This is why I recommend using a fast lens when using extension tubes. The exact amount of light you will lose will depend on the thickness of the tubes (or how far from the sensor plane you move the lens).
Types of Tubes
There are 2 main types of extension tubes. There are those which operate the lens' aperture mechanism, and those which do not. The most commonly found is the type that do not. These are often sold very cheaply on ebay, and come in 5 parts. A body mount, a lens mount, and 3 extensions of various sizes. These work just fine, however, if you want to stop the lens down (and you will, to get more depth of field) these can become quite hard to use. If you stop down the lens, you will notice the view finder darkens significantly, to the point where focusing, and even just composition of a shot becomes hard or even impossible.
I recommend spending a little extra on your extension tubes, and getting the "Auto" type. This means that the extension tubes allow the camera body to still operate the lens aperture through the tubes. This allows you to focus/compose the shot with the lens wide open (as happens with the lens mounted normally) and then the body closes the aperture just as the shot is taken. I have a set of these extension tubes, made by Vivitar for Pentax K mount.
Bellows?
Bellows, what are they? Bellows are basically a very large, length adjustable extension tube. They allow for heaps of magnification, but are heavy and awkward to use. I have not personally used a set of bellows, nor do I see myself using a set of bellows as I like to be mobile. However, keep them in mind.
Which Lens
As mentioned earlier, I recommend using a fast lens which extension tubes, as it allows you to focus and compose more easily after you have lost light from the tubes themselves. Something to keep in mind is, the shorter the focal length of the lens, the more magnification you get from an extension tube. For example, my extension tubes are sized as follows; 12mm, 20mm and 36mm. If I use the largest tube (36mm) with my 50mm lens, I get extra magnification, but if I use the same tube with my 28mm lens, I will get greater than 1:1 magnification! A good approximate rule is, to get 1:1 use the same length of extension tubes as the focal length of the lens. This guideline only applies to lenses which are not extremely close focusing already (like the CZ Flektogon 35mm f2.4 which already focuses to 1:2 magnification, 35mm of tubes will get greater than 1:1 on this lens).
I have successfully used my 50mm f1.7 lens, 50mm f2.0 lens and 28mm f2.8 lens with extension tubes.
Focusing
As before, focusing is best achieved by moving yourself and the camera and lens closer to, and further away from the subject as required, rather than using the focusing ring. See Part 1 for a full description.
Results
Here are some photos taken using my extension tubes. Dont forget to share yours in the comments


Macro Photography Techniques
- Close Focus Lens
- Teleconverters
- Extension Tubes
- Reversed Lenses
- Macro Lens
- Combining Techniques
- Close Up Filters
First off, lets talk about what extension tubes are. Extension tubes are a simple device which mounts between the camera body and the lens. They contain no optical elements (where a teleconverter does). All they do is modify the register distance (distance from the lens to the sensor or film plane) which means the minimum focus distance of the lens becomes much less, as does the maximum focus distance for that matter. You can no longer focus to infinity with a lens mounted on extension tubes. Moving the lens further from the sensor or film plane also results in a loss of light. This is why I recommend using a fast lens when using extension tubes. The exact amount of light you will lose will depend on the thickness of the tubes (or how far from the sensor plane you move the lens).
Types of Tubes
There are 2 main types of extension tubes. There are those which operate the lens' aperture mechanism, and those which do not. The most commonly found is the type that do not. These are often sold very cheaply on ebay, and come in 5 parts. A body mount, a lens mount, and 3 extensions of various sizes. These work just fine, however, if you want to stop the lens down (and you will, to get more depth of field) these can become quite hard to use. If you stop down the lens, you will notice the view finder darkens significantly, to the point where focusing, and even just composition of a shot becomes hard or even impossible.
I recommend spending a little extra on your extension tubes, and getting the "Auto" type. This means that the extension tubes allow the camera body to still operate the lens aperture through the tubes. This allows you to focus/compose the shot with the lens wide open (as happens with the lens mounted normally) and then the body closes the aperture just as the shot is taken. I have a set of these extension tubes, made by Vivitar for Pentax K mount.
Bellows?
Bellows, what are they? Bellows are basically a very large, length adjustable extension tube. They allow for heaps of magnification, but are heavy and awkward to use. I have not personally used a set of bellows, nor do I see myself using a set of bellows as I like to be mobile. However, keep them in mind.
Which Lens
As mentioned earlier, I recommend using a fast lens which extension tubes, as it allows you to focus and compose more easily after you have lost light from the tubes themselves. Something to keep in mind is, the shorter the focal length of the lens, the more magnification you get from an extension tube. For example, my extension tubes are sized as follows; 12mm, 20mm and 36mm. If I use the largest tube (36mm) with my 50mm lens, I get extra magnification, but if I use the same tube with my 28mm lens, I will get greater than 1:1 magnification! A good approximate rule is, to get 1:1 use the same length of extension tubes as the focal length of the lens. This guideline only applies to lenses which are not extremely close focusing already (like the CZ Flektogon 35mm f2.4 which already focuses to 1:2 magnification, 35mm of tubes will get greater than 1:1 on this lens).
I have successfully used my 50mm f1.7 lens, 50mm f2.0 lens and 28mm f2.8 lens with extension tubes.
Focusing
As before, focusing is best achieved by moving yourself and the camera and lens closer to, and further away from the subject as required, rather than using the focusing ring. See Part 1 for a full description.
Results
Here are some photos taken using my extension tubes. Dont forget to share yours in the comments

50mm f1.7 lens, all 3 extension tubes, ISO 100, 1/180 sec, f11.0, onboard flash. These are aphids, the big one is an ant.

50mm f1.7 lens, 36mm extension tube, ISO 100, 1/180 sec, f11.0, onboard flash
This blog has moved to HERE!
Sunday, January 10, 2010
Picnic By the Lake, Under the Tree
This is another Brenizer Panorama I took yesterday at the Mt Cootha Botanic Gardens. Shot with the Pentax K200D and Tair-11a 135mm f2.8 lens, at 2.8.
Shooting and Processing as Follows

Shooting and Processing as Follows
- Shot in Pentax RAW (PEF) - 94 shots
- Import into Lightroom 2.5
- Export to 16 bit TIFF with ZIP compression
- Stitched using Autopano Giga 2
- Rendered to 16 bit TIFF
- Imported into Lightroom 2.5
- Heavy crop (94 images was for a much bigger scene, but I only liked this part of it)
- Edited as shown below (Basic tab only)
- Export to JPG for Web

This blog has moved to HERE!
Friday, January 8, 2010
Macro Photography Techniques - Part 2
This is the 2nd technique I've used when taking macro photos (also the one I've used the most).
Macro Photography Techniques
This technique requires a teleconverter. A teleconverter is an accessory which mounts between your camera and your lens. The effect is increase of focal length. In this case you will probably want a 2x Teleconverter, which is designed to double the effective focal length of your lens. However it does not change the minimum focus distance, so you end up with the same lens, focusing at the same distance, but you get twice the magnification of the image. You can also get Macro Focusing Teleconverters (such as this) which have their own focusing ring, and allow extra magnification, and a good level of control over the magnification.
Drawbacks? Of Course...
The downside of this technique is that a 2x teleconverter, while doubling your effective focal length, it also reduces the effective aperture (incoming light) by 2 stops. So if your kit lens happens to be a Pentax SMC DA 18-55mm f3.5-5.6, and you are wanting to get maximum magnification (55mm @ minimum focus distance) adding a 2x teleconverter will mean that the lens (wide open, where it is a bit softer) becomes 110mm at f11.2. So in order to get a fast shutter speed you will need either high ISO (noisy) or a flash. I have had very good success just using the onboard flash though.
A teleconverter will also exaggerate any quality problems in the lens you are using. If you lens is a bit soft, it will be twice as soft using the 2x teleconverter. So you must be cautious about how you use it. This is where using a flash is also helpful, as it allows you to use a smaller aperture, which will mean the lens is going to be closer to its sweet spot for sharpness.
Another obvious drawback is that you need an extra piece of equipment. I was able to acquire an older 2x teleconverter to fit Pentax K mount on ebay for about $15. It has no "A" contacts (for camera autoexposure) or autofocus. Ideally you would want to have the "A" contacts for auto exposure, however, auto focusing is not required for this technique as you will be using manual focus mode set to minimum focus distance anyway.
Focusing
The same method for focusing is used as for the previous technique. You can read up on that here, in Part 1.
Results
Here are a couple of photos taken using this technique, including settings.


For those of you who already have teleconverters, why not give this technique a try, and post up the results in the comments.
Macro Photography Techniques
- Close Focus Lens
- Teleconverters
- Extension Tubes
- Reversed Lenses
- Macro Lens
- Combining Techniques
- Close Up Filters
This technique requires a teleconverter. A teleconverter is an accessory which mounts between your camera and your lens. The effect is increase of focal length. In this case you will probably want a 2x Teleconverter, which is designed to double the effective focal length of your lens. However it does not change the minimum focus distance, so you end up with the same lens, focusing at the same distance, but you get twice the magnification of the image. You can also get Macro Focusing Teleconverters (such as this) which have their own focusing ring, and allow extra magnification, and a good level of control over the magnification.
Drawbacks? Of Course...
The downside of this technique is that a 2x teleconverter, while doubling your effective focal length, it also reduces the effective aperture (incoming light) by 2 stops. So if your kit lens happens to be a Pentax SMC DA 18-55mm f3.5-5.6, and you are wanting to get maximum magnification (55mm @ minimum focus distance) adding a 2x teleconverter will mean that the lens (wide open, where it is a bit softer) becomes 110mm at f11.2. So in order to get a fast shutter speed you will need either high ISO (noisy) or a flash. I have had very good success just using the onboard flash though.
A teleconverter will also exaggerate any quality problems in the lens you are using. If you lens is a bit soft, it will be twice as soft using the 2x teleconverter. So you must be cautious about how you use it. This is where using a flash is also helpful, as it allows you to use a smaller aperture, which will mean the lens is going to be closer to its sweet spot for sharpness.
Another obvious drawback is that you need an extra piece of equipment. I was able to acquire an older 2x teleconverter to fit Pentax K mount on ebay for about $15. It has no "A" contacts (for camera autoexposure) or autofocus. Ideally you would want to have the "A" contacts for auto exposure, however, auto focusing is not required for this technique as you will be using manual focus mode set to minimum focus distance anyway.
Focusing
The same method for focusing is used as for the previous technique. You can read up on that here, in Part 1.
Results
Here are a couple of photos taken using this technique, including settings.

SMC F 35-70mm @ 70mm (effective 140mm), f11 (effective f22), 1/180 sec, ISO 200, onboard flash

SMC F 35-70mm @ 70mm (effective 140mm), f16 (effective f32), 1/20 sec (this should be shorter), ISO 400, onboard flash

SMC F 35-70mm @ 70mm (effective 140mm), f11 (effective f22), 1/180 sec, ISO 200, onboard flash
For those of you who already have teleconverters, why not give this technique a try, and post up the results in the comments.
This blog has moved to HERE!
Thursday, January 7, 2010
Macro Photography Techniques - Part 1
This is the start of a series of posts on Macro Photography Techniques which I have successfully used. Each part will be a different technique. Feel free to add any ideas you have as comments, and also to post your macro's if you have used the techniques before, or after you go and try it!
Macro Photography Techniques
The Close Focus Lens
The first technique in the series will be the most obvious one, a close focus lens. A close focus lens is a lens which focuses quite closely, but is not a true macro lens. For example, the Pentax standard kit lens is the SMC DA 18-55mm f3.5-5.6. This lens focuses down to 25cm, which (at 55mm focal length, fully zoomed in) gives a reproduction ratio of around 1:2.9. A true macro lens will allow focusing down to a 1:1 ratio (older Macro lesnes are actually only 1:2). Even with 1 of these types of lenses some great macro shots can be created. Most DSLR owners will have a close focusing lens as most kit lenses are close focusing so its a technique anyone can try (and most would have).
Getting The Most From It - Focusing
The key with a close focus lens is being able to focus on something, with the sensor plane as close as possible to the subject. You need to make sure you are at that minimum focusing distance when you take the shot to get the maximum possible magnification from your lens. The easiest way to do that, is to set your camera (or lens, depending on model) to manual focus, and set the focus manually to the minimum focus distance. Once you have done that, all you need to do is to get nice and close to your subject, and focus by moving the camera (and probably yourself too) further away from, or closer to the subject as required. This will mean you get the maximum magnification because the lens is pre-set to the closest possible focus point. By moving the camera you move the subject into the correct distance and into focus.
This is the focusing technique I use for all my macro photography, so will apply across this whole post series. To help you achieve correct focus most cameras will have a focus confirmation of some kind, even in manual focus mode. Pentax cameras have a focus confirmation beep (which can be disabled) as well as a green hexagon displayed in the view finder once focus is confirmed. However, when using manual focus only the centre focus point can be used, so you must point the centre of the frame at the subject while focusing.
Depth Of Field - It's Too Narrow!
With macro photography narrow depth of field can become an issue. When you are so close to your subject, and have a longish focal length, it will cause your depth of field to become very narrow. The only way to increase it is to use a smaller aperture (larger f number, eg f22). This will make your shots very dark, or your shutter speeds very long. To overcome this, you could use a flash. An off camera flash is preferred, but the on camera flash can work just fine too, especially with a reflector (I'll explain that in a later post).
What this means for you, is (as always) the photo becomes a balancing act between shutter speed (fast to avoid blur), aperture (small to get the DOF you want) and ISO (low to avoid noise).
The Results
Here are a few shots I have taken using this method. Including the settings used.


Time to get out and take some macros. Don't forget to post the results in the comments section. Stay tuned for the rest of the posts in this series.
Macro Photography Techniques
- Close Focus Lens
- Teleconverters
- Extension Tubes
- Reversed Lenses
- Macro Lens
- Combining Techniques
- Close Up Filters
The Close Focus Lens
The first technique in the series will be the most obvious one, a close focus lens. A close focus lens is a lens which focuses quite closely, but is not a true macro lens. For example, the Pentax standard kit lens is the SMC DA 18-55mm f3.5-5.6. This lens focuses down to 25cm, which (at 55mm focal length, fully zoomed in) gives a reproduction ratio of around 1:2.9. A true macro lens will allow focusing down to a 1:1 ratio (older Macro lesnes are actually only 1:2). Even with 1 of these types of lenses some great macro shots can be created. Most DSLR owners will have a close focusing lens as most kit lenses are close focusing so its a technique anyone can try (and most would have).
Getting The Most From It - Focusing
The key with a close focus lens is being able to focus on something, with the sensor plane as close as possible to the subject. You need to make sure you are at that minimum focusing distance when you take the shot to get the maximum possible magnification from your lens. The easiest way to do that, is to set your camera (or lens, depending on model) to manual focus, and set the focus manually to the minimum focus distance. Once you have done that, all you need to do is to get nice and close to your subject, and focus by moving the camera (and probably yourself too) further away from, or closer to the subject as required. This will mean you get the maximum magnification because the lens is pre-set to the closest possible focus point. By moving the camera you move the subject into the correct distance and into focus.
This is the focusing technique I use for all my macro photography, so will apply across this whole post series. To help you achieve correct focus most cameras will have a focus confirmation of some kind, even in manual focus mode. Pentax cameras have a focus confirmation beep (which can be disabled) as well as a green hexagon displayed in the view finder once focus is confirmed. However, when using manual focus only the centre focus point can be used, so you must point the centre of the frame at the subject while focusing.
Depth Of Field - It's Too Narrow!
With macro photography narrow depth of field can become an issue. When you are so close to your subject, and have a longish focal length, it will cause your depth of field to become very narrow. The only way to increase it is to use a smaller aperture (larger f number, eg f22). This will make your shots very dark, or your shutter speeds very long. To overcome this, you could use a flash. An off camera flash is preferred, but the on camera flash can work just fine too, especially with a reflector (I'll explain that in a later post).
What this means for you, is (as always) the photo becomes a balancing act between shutter speed (fast to avoid blur), aperture (small to get the DOF you want) and ISO (low to avoid noise).
The Results
Here are a few shots I have taken using this method. Including the settings used.

SMC M 28mm f2.8 @ min. focus + cropped - ISO 100, 1/100 sec, f4.0 (from memory)

Tokina RMC 70-210mm f3.5 @ 210mm min. focus + cropped, ISO 200, 1/640 sec, f3.5
Time to get out and take some macros. Don't forget to post the results in the comments section. Stay tuned for the rest of the posts in this series.
This blog has moved to HERE!
Project 52 - #1 - It Begins
Here is the first shot for my 2010 Project 52 which I have decided to use the theme of "Brisbane Landmarks". It is a Nepalese Peace Pagoda located at Southbank in Brisbane, QLD Australia. It was built for Expo '88 and petitioned successfully to remain on the old Expo site (which is now Southbank).
This photo is a HDR, combined from 11 shots. All shots were taken at f16.0 and ISO 100, and shutter speeds were - 1/30, 1/15, 1/8, 1/4, 1/2, 1, 2, 4, 8, 15, 30 secs.
Processing as follows :-


- Shot in Pentax RAW (PEF)
- Imported into Lightroom 2.5
- Shots exported to 16-bit TIFF
- Photomatix generated HDR from 11 16-bit TIFFs
- Photmatix Tone Mapped using Tone Compressor
- Saved as 16-bit TIFF
- Imported new file back to Lightroom 2.5
- Cropped in Lightroom 2
- Edited in Lightroom as shown below (settings not shown were not edited)


This blog has moved to HERE!
Subscribe to:
Posts (Atom)
